This is a very thorough walkthrough, with lots of spoilers.
Getting Started
Lohkit Island
Hollis Island
Residential Area
West Independence City
Central Independence City
East Independence City
Getting to West Zinlasia
West Zinlasia
Exploring West Zinlasia
The Quests
Mage Guild Quests
Mages Guild Quest #1 - Test of the Initiate
Mages Guild Quest #2 - Test of the Conjurer
Mages Guild Quest #3 - Test of the Magician
Mages Guild Quest #4 - solve problem with giants; Wizard
Mages Guild Quest #5 - Learn all level 7 spells; Master Wizard
Challenge Mage Guilds master wizard for leadership
Priests Guild Quests
Priests Guild Quest #1 - get troglodyte shaman’s stick; Initiate
Priests Guild Quest #2 - destroy troglodytes altar; Acolyte
Priests Guild Quest #3 - get slith map; Disciple
Priests Guild Quest #4 - destroy sliths altar; Curate
Priests Guild Quest #5 - Lucinda'a Manor; High Priest
Alchemists Guild Quests
Alchemists Guild Quest #1 - get glowing nettle
Alchemists Guild Quest #2 - get gray mold
Alchemists Guild Quest #3 - get ember flowers
Alchemists Guild Quest #4 - get asptongue mold; Novice Alchemist
Alchemists Guild Quest #5 - get mandrake root seeds; Expert Alchemist
Thieves Guild Quests
Thieves Guild Quest #1 - get necklace for Jezelle
Thieves Guild Quest #2 - get ring for Harry
Thieves Guild Quest #3 - get spotted gecko for Johnny
Thieves Guild Quest #4 - get Clint’s sword from sliths
Thieves Quest #5 - get gumby picture for Montague
Finishing the Game
The Nephilims Story
Meirinkiprr and the Trial
Crazy Bob and the Psych Ward
Bonnie is Captured
Shrin Lakka
The Hollows
You start out in the town of Harper on Lohkit Island which is in the southeastern part of West Zinlasia. You have been shipwrecked on the way here and Clara has generously put you up in her boarding house until you have recovered. In fact, she has grown fond of you and has offered to keep your room for you should you need to rest or store stuff. Also staying at the boarding house is Clara’s niece Bonnie.
When you leave the boarding house the first time, you will be intercepted by Grover, apparently a local boy who is starting up a messenger service. From time to time he will pop up and give you a message relating to the game.
Also living in Harper is Bernie, who sells cheap weapons, and Sarah who sells food. There are a few other people in town you can talk to, but they don’t contribute much to the game.
When you exit Harper, to the west is the ferry dock where you came in. Should you want to quit the game, then head out there.
Just to the east of Harper is Emily’s Place. Talk with her and she will ask you to pick up a salve from the Healer who lives a little further down the road. Go there, ask her about ‘Emily’ to get the graymold salve and return to Emily’s Place. She will then teach you the recipes for Weak Healing and Weak Curing and allow you into her garden where she grows mushrooms, holly and comfrey root. These herbs regrow every 3 to 4 days.
The next town on the road is McPearson’s Farm. Benjamin is here alone and needs help collecting the chicken eggs. This can be steady work, as every three or four days the job needs doing again. Don’t kill any of the chickens or you’ll never work for him again. There are a lot of chickens in the chicken house. You’ll have to press the wait key several times to navigate to the back of the chicken house to retrieve the eggs, and then again to exit the chicken house. It’s a bit of a pain, but at 5 gold apiece, this comes to 20 gold each time you do this little chore.
After McPearson’s Farm, you will come to the Cattle Ranch. This is another opportunity to make some cash if needed. Talk to Phil to buy slabs of meat for 3 gold each, which you can deliver to Everett at the Bayside Resort for 6 gold each. Bayside resort is a town just a little ways north and east of Independence.
Just a little further down the road you will come to Carl’s Stables. This is where you can buy a horse for 400 gold.
One final stop before we leave Lohkit Island is the Cottage in the Woods, which is off the main road on the eastern side of the island in the middle of the (surprise!) woods. Felix will sell you the Weak Poison Potion and the Weak Speed Potion recipes and tell you where to get wormgrass near the swamps just a little further east. Talk to the cats, until you find Meika. Say ‘Meow’ to her once and get 17 points experience.
*** Bug Alert ***
If you go to central Independence city and leave, this resets the flag so you can get
more experience later. Just north of this cottage is a place you can get some free food.
This also is buggy in that it seems to be a one shot, but you can do it again after
visiting Central Independence City.
*** End Bug Alert ***
After you cross the bridge to Hollis Island, follow the road north and follow the east fork to the Trappers Hut. Hank can sell you leather armor, but more importantly he will buy fur pelts from you. One place to get them is a Wolf Cave on the other side of the mountains. If you go there now, don’t bother with the locked room in the back. You need a password to get in.
Just a little south of the Trappers Hut is a cave full of Critters. You can come in here to get some experience and maybe some fur pelts too. Don’t come here until you are prepared for a good (low level) fight. Bears can dangerous to low level adventurers. There is a stalagmite you can’t pass just yet. You need to find a sledgehammer first.
On the east side of the Island near Independence is the Ferry Landing. Not much here, just a closed ferry landing and Captain Eddy who tells you it is closed. You can safely rob the ferry office of some gold, but that is about it.
Before we go into Independence, you might like to go to the Bayside Resort just northeast of it and talk to Everett, especially if you are carrying slabs of meat from Phil’s ranch and want to sell them. If you break into the rooms, some of them have stuff you can steal for a quick profit; just make sure no one sees you take it. One character in room 101, Clyde, accuses you of being thieves. If you say ‘thief’ to him, he gets hostile. After you fight him, look in his chest for 250 gold. The only other person of note in this town is Alfred Winthorp in room 106. He has some part in the game, but we haven’t gotten to that part yet.
Just to the west of Independence is the Independence City Zoo. The zoo is closed because something has been killing the animals in the Subterranean Exhibit. Talk to the guard and say ‘help’ to be let in. In the southeast corner of town, talk to Ernest about the problem. The only evidence of the killings is a pit near the exhibit.
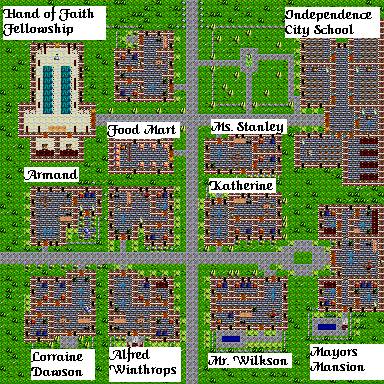
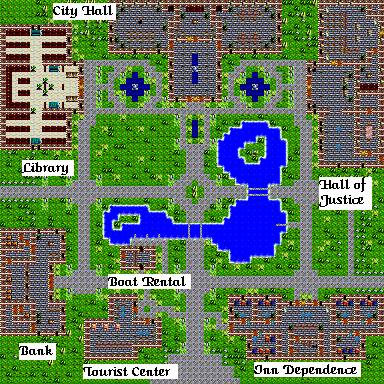
Finally, let’s go into Independence. If you enter town through the southwest icon, you will wind up in the Residential Area. Refer to the maps as I walk through this town.
First head up to Katherine’s house. When you talk to her, she wants to communicate her affection for Armand. Go to Armand and say ‘Katherine’. He will respond that she’s ‘sweet’. Tell that to Katherine, and she will have an idea. Say ‘idea’ and she will give you a flower to take to Armand. Back in Armand’s house, a special will pop up and Armand will complain loudly about this whole affair. He tells you to look into the room beside him; do so and talk to Bruce. Ask Armand about ‘Bruce’ and you’ll find out why he isn’t interested in Katherine. Return to Katherine. When you get there, a pop-up dialogue asks you to tell her either he has a girlfriend or a boyfriend. It does not matter which response you give her; you still get 25xp for this minor quest. As an aside, Katherine now expresses an interest in Bruce. As I am sure you can guess, there is no reward in going further with this situation.
Next I went into Lorraine Dawson’s house. She is upset that her husband William is in jail for stealing from a Mr. Wilkson. She begs for you to help prove his innocence. We'll follow up on this later.
Mr. Wilkson’s house is the next stop. He will tell you that it was his hunters’s horn that William Dawson was trying to steal. Other than telling you about his ‘doggie woggies’, there is not much else here.
Just east of the Dawson house is Mr. Winthrop’s house. We’ll skip this house for now.
Just east of Mr. Wilkson’s house is the Mayors Mansion. Mrs. Brundig is here, but she has no quests for you just yet. Come back later and she will have one or two for you.
Just north of the Mayor’s Mansion is the Independence City School. Mr. Livingston was teacher here until they closed the school down. Apparently he is a bit miffed about how Mayor Brundig is changing the school curriculum, especially about the removal of all the history books. What is the Mayors agenda I wonder. Anyways, Mr. Livingston can provide training in all capacities, including magic. In the library there is a set of books you can read that will increase your intelligence.
Just west of the school is Mrs. Stanley’s house. Her first name is Beth, but she isn’t very talkative. We’ll talk to her later.
Across the main street to the west is the Food Mart. Harold doesn’t say much; just sells food.
The last place to visit is the Hand of Faith Fellowship. Brother Thomas will tell you about how the local government has restricted the activities of the priesthood, and that if you need any medical attention, you need to go to the Medical Center. What gives with this society that priests are not allowed to perform healing magic, anyway?
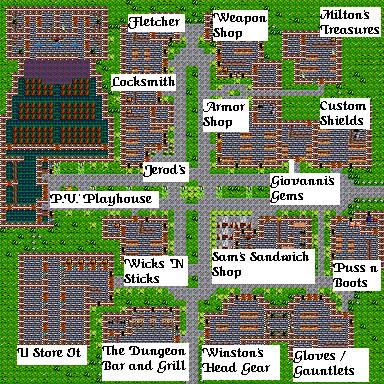
Heading north from the Residential Area, we find ourselves in West Independence. This is the commercial district with all sort of shops. This part of town is divided into four quarters which we’ll explore now.
In the southwest quarter the first shop on the left is The Dungeon Bar and grill. Al runs the place, and sells beer and food. Ask him about the house specialty, which is Independence Ale. He has a few things to say about the people of the town as well. Just west of him is the U Store It, run by Edgar. He rents storage areas, but nothing is available right now. On the same block is the Wicks ‘N Sticks, run by Kimberly. You can buy candle, lamps and torches from her.
In the southeast quarter, you have a Helmet shop run by Winston. Next door his wife Matilda runs a Gauntlet shop. Puss ‘n Boots is a boot shop run by a nephil named Meirinkaprr. Buy the swamp boots which protect against poison. Sam’s Sandwich Shop, run by (guess who) Sam is a good place to buy food.
In the northeast quarter you have a shield shop run by Michael. Giovonni’s Gems is where you can buy non-magical gems and where you can sell your old stuff. Pete and Maximillian run the Armor shop. Max can enchant weapons (magical weapons are banned by the government by the way). Milton’s Treasures is hidden in the corner. It is a little random item shop run by Milton who has a lot to say about the Mage’s Guild. You can also sell your stuff to Milton, as well.
The northwest corner has a Fletcher’s shop run by Abraham. His piercing arrows are expensive, but worth every penny. Check out the storage room in his shop, via a secret door. There’s 100gp there just for the picking by hungry adventurers; oops, watch out for traps. Charles runs the Locksmith shop where you can buy lockpicks. He used to be a member of the Thieves Guild. We will have some dealings with him again later. Jerod’s Fine Garments is a simple garment shop. Dominating the northwest corner of town is P.V.’s Playhouse, an acting theatre run by P.V. Witless. He is producing a play based on Exile III- Ruined World, but they are just in the rehearsal stage. You can talk with the actors for a bit of comic relief.
In the very center of this town is Crazy Bob. He doesn’t say much at this time; just that the end of the world is coming soon.
In the southwest corner is the Bank, the Tourist Center (closed) and a place you can rent boats to row on the lake. On the island in the lake is a patch of glowing nettle, which you can’t get just now.
In the southeast corner is the Inn Dependence, which is an inn run by Clarence.
The City Library takes up the northwest corner. They have removed the history books for some reason, but Ignatius will gladly tell you about the history of Hollis Island as well as about the four guilds that used to thrive here until the government shut them all down; the Mages Guild, the Priests Guild, the Alchemists Guild and the Thieves Guild. This all leads to more questions than it answers. Some of the shelves contain reading material. In the southeast corner of the library is a book that will increase your item lore skill.
The northern part of town is the City Hall. You can’t get in to see Mayor Brundig yet. When you ask the guard for advice he tells you to get in with someone of power or a relative in order to get an appointment. If you go up the stairs in the back, you can get into the council meeting where they are discussing topics of importance to the community. Take notes.
The northeastern part of town is the Hall of Justice. Judge Hastings presides over the court, but does not talk about it much.
One of the first things I wanted to do here is talk to William Dawson, who is cooling his heels in the City Jail which is in the northwest corner of town. You can’t get past the gate to the cells until you talk to the warden just outside and say ‘Dawson’. Talk with William and he will tell you about how he came to be here. He tells you that the Thieves Guild is based on the mainland and has a boat to get there. Then he instructs you to talk to Charles, the Locksmith in W. Independence, and ask him about a ‘boat’.
Adjacent to the jail is the Armory. Here is where the troops are quartered and where Commander Dinaarch runs the community. He is so anti-magic, he even puts the Anama to shame. In fact he would abolish them as well.
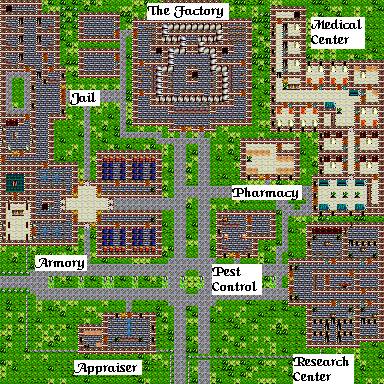
The Factory is in the northern part of town. Here is where they make chairs ... lots of chairs.
The research center is interesting, but the only thing of value is the hint that some magicians are establishing a new center on the mainland and that they have some way of getting back and forth.
The Medical Center is this governments replacement for the healing aspect of the priests. Dr. Cassius can provide healing here. If you want to get into the Psych ward, you will need permission from Dr. Beispew. No need to go here until you get a combination for the door at the end.
Other points of interest include:
the Appraisers office, where you can get identification done
the Pharmacy, which sells weak potions, er, tonics
the Pest Control, which sells weapons poison and buys asp fangs and spider glands.
South of East Independence City is the Coloseum Construction Site. You can’t go there until you get a pass from Mayor Brundig. To do this, you need to have gotten the advise from the guard outside Mayor Brundig’s office. Go back to the Residential section, and ask Mrs. Brundig about ‘quest’. She will now tell you to get the purple dress from the dress shop in W. Independence. Go there and buy it and return to Mrs. Brundig. Say ‘dress’ and you will get her name to tell the guard. Return to him and say ‘Margaret’. You’re in. Ask Mayor Brundig about ‘coloseum’, then ‘pass’ you now have a pass to enter the coloseum. Go to the eastern end of it and you will find a sledgehammer. Remember the Critter Caves? Now we can proceed further into them. Also in the southwest corner are some planks and nails. We don’t know what these will be needed for yet, but get them anyway.
Right now the only lead we have to solve the riddle of this strange community is William Dawson’s lead into the Thieves Guild. Head back to W. Independence to talk with Charles the Locksmith. Say ‘boat’ and he will ask a favor of you. He wants you to get P.V. Witliss to put into a play. Go into the playhouse and tell Witliss ‘Charles’. At first Witliss refuses to hear about changing his current production, but he discovers that a chair is broken. You offer to get a new chair for him, if he will change his mind about Charles. Head to the Factory in East Independence City and talk to Marty at the front desk. Say ‘Witliss’ and he gives you a chair. Return to the playhouse and say ‘chair’ to Witliss. He takes the chair and agrees to audition Charles for his next play. Return to Charles and say ‘boat’ again. He will direct you to a cave in southern Hollis Island, the Wolf Cave. Head there, get some pelts by killing wolves, find a bunch of food in a hidden room, and work your way to the back to where the door is. Say ‘dagger’ to the guy in the window; he lets you in. Talk to him to learn more about the Thieves Guild. Ask him about ‘boat’. He will send you on a quest to steal the Spruce Diamond which is owned by Alfred Winthrop. (You can steal their treasure in the locked room and get 250 gold. Just make sure to close the door before you do.)
About this time Grover pops up and gives you a free pass to see Witliss’ play production. Since we are returning to Independence City, we will see it soon.
Enter town through the Residential Area. Save the game before attempting to enter Alfred Winthrop’s house, as there is an alarm trap that turns the whole town hostile if you fail to disarm it. In searching his house, you will find a note in a dresser that looks like a check list. You find out that Alfred Winthorp is currently at Bayside Resort. You can try going there to talk to him about this treasure, but he won’t help you much. One item on the checklist is to take the S.D to Robert in Harper. We’ll go there in a little bit. First let’s go see that play.
Head north into W. Independence City, and toward the playhouse. Talk to the ticket seller and say ‘pass’ to get in. As you approach the stage, go into combat mode, if you want to save as many civilians as possible. Giant Spiders attack the cast. Kill them, especially the one behind the stage. Witliss will ask you to kill all the spiders. Enter the first dressing room on the right. See the crack in the wall? Cast Move Mountains on it, and check out the hole outside. Talk to Witliss about the spiders.
*** BUG ALERT ***
After taking care of the spiders, do not go from West Independence City to the central
Independence City. Doing this messes up the your first encounter with the Alchemists guild
in West Zinlasia and affects some of the story line involved with them. After you have
completed your first assignment with the Alchemists Guild, then this bug no longer matters.
*** END BUG ALERT ***
Now let’s head out for that Spruce Diamond. Head south back to Lohkit Island, back to Harper. It is about this time that Grover runs up with another message. Clara back in Harper has a quest for you to investigate some noises coming from one of the rooms. Since we are going there anyway, let’s get a move on.
Upon entering Harper, head to the boarding house and go into Bonnie’s room. You’ll get a quest to fetch the exterminator from E. Independence City to get rid of the pests making the noises. Now let’s go talk to Robert. Ask him about ‘spruce’ or ‘diamond’. When he asks you why, you can pick either response; save the game and try them both just for fun. In either case, he will ask you do a quest for him, which is to find the diamond. You will need to find the small chest it is in and enter a combination to open it. Return to Alfred Winthorps home and search the chest in the library. The paper will tell you the combination is 8,3,7,9.
On the way back to Independence City I wanted to check out the critter cavern again, now that I have a sledgehammer. Once you get past the stalagmite, pick all the gems. Don’t forget the rough diamond which looks like a rock.
Now it’s back to Independence City to find the exterminator. Talk to Stan and say ‘personal’ or ‘service’. He says he will meet you in Harper.
Back in Harper, Stan is there and he reveals the location of the rats den, just outside of Harper. Go there and clean it up. In the southwest corner there is a small chest that contains the Spruce Diamond. Enter the combination ‘8379’ and retrieve the diamond.
Now that we have the diamond, head back to the Wolves Cave and talk to Wendell and say ‘spruce’ or ‘diamond’. He will reveal the location of the boat in the northeast shore of Bayside Resort. It’s time to start some real adventuring.
When you get to the Bayside Resort, head for the northeast shore. You will now find an opening in the trees leading to a boat. If you did not pick up the boards and nails in the Coloseum, you will have to go back and get them now in order to repair the boat. Sail across to West Zinlasia Island.
I wandered around for a little bit before I starting working on the Guilds quests.
The forest on the east back of the river is impassable for a ways. If you land on the west bank of the river, you will wind up in Meikaprr Forest. Wandering around here seems to trigger a lot of wolves and bears, which is good for building up experience. There is also a hut but you can’t enter until you can prove you are a member. Member of what?
Further north on the river you will come to a bridge with a road crossing going east and west. Following the road on the west side of the river will take you to the Mage Guilds tower and to the Priest Guilds temple. Going east on this road and taking the first fork in the road south, you will come to the Ranch House where you can buy horses or rest up.
Continue southeast along the road and you will come to Lancaster. Its population is not very friendly to outsiders (meaning you), but you can buy some good stuff here, at a premium.
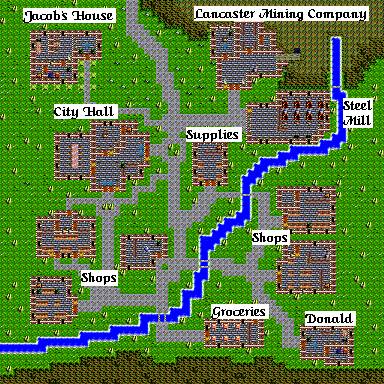
In the shops in the southwest corner of town you can buy protective gear (helmets, shields, gloves), missiles, jewelry, and there is someone who can identify things. The groceries store is where you can buy food, and in the shops just northeast of it you can buy weapons, enhancements and high quality armor. The supplies shop sells boots and light sources. Talking o Monroe in the Mining Company, you find out that he is running short handed because some noises in the mines have spooked the workers. We will investigate this later.
To the south is the guard post keeping the Nephilim out of Lancaster Valley. Save this trip for later. To the north is Lancaster Manor, the home of Lancaster Simms who owns this valley.
In the northeast corner of West Zinlazia is The Farm. This is the community established by the Alchemists Guild. Here you can buy alchemical recipes as well as potions.
On the road west out from The Farm there is a little hut. It seems to be abandoned for now, and you can get some good money from it if you want, but if you hold off for now I think you will find it better to visit this after you complete your first Alchemist’s quest.
North of the where the river ends you will find the Dark Cave where the Thieves Guild is headquartered.
I am collecting all the quests together according to guild, but some quests are more difficult than others and it makes sense to try to tackle them later than sooner. I recommend going to each guild and getting their first assignment. The following sequence is in order of increasing difficulty:
Alchemists Guild Quest #1 - get glowing nettle
Thieves Guild Quest #1 - get necklace for Jezelle
Thieves Guild Quest #2 - get ring for Harry
Mages Guild Quest #1 - Test of the Initiate
Thieves Guild Quest #3 - get spotted gecko for Johnny
Mages Guild Quest #2 - Test of the Conjurer
Mages Guild Quest #3 - Test of the Magician
Alchemists Guild Quest #2 - get gray mold
Alchemists Guild Quest #3 - get ember flowers
Priests Guild Quest #1 - get troglodyte shaman’s stick; Initiate
Priests Guild Quest #2 - destroy troglodytes altar; Acolyte
Priests Guild Quest #3 - get slith map; Disciple
Mages Guild Quest #4 - solve problem with giants; Wizard
Alchemists Guild Quest #4 - get asptongue mold; Novice Alchemist
Thieves Guild Quest #4 - get Clint’s sword from sliths
Priests Guild Quest #4 - destroy sliths altar; Curate
Thieves Quest #5 - get gumby picture for Montague
Priests Guild Quest #5 - Lucinda'a Manor; High Priest
Mages Guild Quest #5 - Learn all level 7 spells; Master Wizard
Alchemists Guild Quest #5 - get mandrake root seeds; Expert Alchemist
Challenge Mage Guilds master wizard for leadership
(Thanks to Luz Piazuelo for the solutions to these puzzles.)
First lets tackle the Mage Guild. Head west along the road to the Mage Guilds Tower. We passed it a few times going to the slith lands. There is not much you can do on this first floor. Talk with Clodius who is near the stairs up. Read the tome next to it. If you need more Mage Lore, search the library behind the stairs for a book that teaches some.
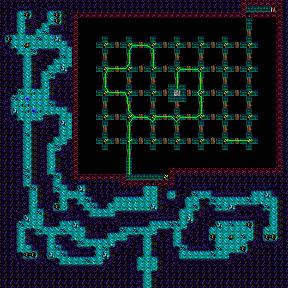
The Test of the Initiate is in a Goblin Cave which is to the east of the Dark Cave of the Thieves Guild. Go there, kill a bunch of goblins and other little monsters. Work your way to the basalt building and go in. First thing you need to do, is destroy the Ice Crystal by the center of the test hall. Some bridges will fall, others will let you pass. Don't worry about this, and find your way to the thing. After destroying it, pull the lever under its rubble: it will open the door to the portal. Now, you need to reach the NE corner. Your path goes through two teleporter runes: the first one at 25,11 (3rd column, 2nd row), the second at 37,23 (6th column, 5th row). Try not to step on other runes than these, because some will teleport your party back to the door (including the NE one!). Once you use the teleporter back to the entrance, you can return to the Mage Guilds tower and get to the second floor. One of the mages here sells magic crystals, the other sells all the level 4 mage spells. You also get the password for the next quest. Look for a Tome of Learning on this level.
The Test of the Conjurer is just to the west in the northern Slith lands. To pass this test you need to reach the portal by the northern end. The path to it is blocked by a special type of magic barriers. The barriers are easy to dispel, though: you only need to put on every platform some of the colored orbs you'll find around the place.
Still, the orbs must be combined in a certain order:
1st chamber (S): |
Red |
— |
|
|
|
|
|
— |
|
|
|
2nd chamber: |
Blue-Green |
— |
|
|
|
|
|
— |
|
|
|
3rd chamber: |
Blue-Red |
— |
|
|
|
|
|
— |
|
|
|
4th chamber: |
Green-Blue-Red |
— |
|
|
|
|
|
— |
|
|
|
5th chamber (N): |
Blue-Green |
— |
|
|
|
|
Green-Blue |
— |
|
|
|
After complete this quest, return to the Mage Guilds tower and you can get to level three. You can buy level 5 spells now. A storage room has some nice items in it. Look for a Tome of Learning on this level. Get the password for the next quest.
The Test of the Magician quest takes you into the nephilim lands past Lancaster Valley to the Meikaprr Forest. To pass this test you need to reach the portal inside the central chamber. But this chamber is completely enclosed with Magic Barriers, and even if you dispel them, the door is locked and it won't budge. So, how do you open the door? Pulling the levers, of course. But you must do it in a certain way, hinted at the signs in the walls of said central chamber:
21,22: |
NW=1 |
— |
|
— |
In other words: The 1st and 4th levers, |
23,17: |
1001 |
— |
— |
||
27,23: |
CLOCKWISE |
— |
— |
Returning to the Mage Guilds tower you now have access to the fourth level where you will find a scroll seller and someone to teach you all the level 6 mage spells. Read the book near the stairs up to get the password for the last quest.
The Test of the Enchanter is located in the slith lands again, almost due south of the Mage Guilds tower. To pass this test, you need to reach the portal beyond the levers & walls puzzle. But first you must find your way to it through a maze of square chambers with secret doors. Here or there, you will find some hidden signs; read them all and you'll have the clues to solve the puzzle.
4,41: |
M |
N |
— |
A |
B |
— |
— |
|
— |
Meaning if you pull the 7 levers corresponding to letters |
L |
|
|
|
C |
||||||
F |
|
|
|
D |
||||||
J |
|
|
|
E |
||||||
I |
H |
— |
G |
F |
||||||
8,13: |
JIG |
|
|
|
||||||
24,28: |
CLAD |
|
|
|
||||||
36,17: |
7 |
|
|
|
||||||
|
|
|
|
|
||||||
24,5: |
Don't EVEN try to guess! |
|
||||||||
Head back to the Mage Guilds tower to reach the highest level and meet the Master Wizard. He gives you access to the portals that are located around West Zinlasia which are in sealed obelisks. He gives you a key so you can get in and out of them. When you use the portal from the Mage Guilds tower, it links you to an obelisk in the central mountains of Hollis Island. From there you can link to (clockwise from NW), the Mage Guilds Tower, a hidden valley near the Alchemists Farm, the nephilim lands south of Lancaster, and the Slith lands near the slith fort. He also offers to promote you to the rank of Wizard if you perform one final task for him.
This quest is one of those you should put off until you are pretty strong. You are asked to quiet a problem with some hill giants north of the Alchemists home. He gives you a gift to allow you to pass into the hill giants realm without having to do too much fighting. Go to the Alchemists valley to the east, fly over the hills to the north. Wander through the southern passages of the CatsClaw mountains going west until you get to a little village. One of the huts has a fellow named Mortimus, who explains what is happening to this valley. He is working a crystal that will allow him to pass a barrier in a dragons cave so that he can talk to him. You can read his journal in the bookcase as well. Go north through a major ambush of hill giants, and head to the Hill Giants Stronghold. Enter the stronghold. When you try to pass through the inner gates, you will be allowed only if you have the Glowing Thingy. Continue down the hall to give the Glowing Thingy to the Hill Giant king, and find out why they are rampaging. Again he explains about the problem with the dragon. Now head back the way you came and follow the passes to the northeast corner of the mountains to the Cave of Tyrexaus. You will meetMortimer again who has the crystal. Walk towards the barrier and he will use it, killing himself in the process. Work your way to the back of the cave. Along the way you can learn one of the level 7 mage spells, quickfire. Talk with Tyrexaus, and he will explain that he is attacking the hill giants because they stole from him and he wants his stuff back.
You can solve this problem a few different ways. You can kill Tyrexaus now, tell the giant king about it and finish this (not recommended; Tyrexaus is very, very strong). You can return to the Hill Giant Stronghold, sneak in through a secret passage on the west side of the main gate, steal back the armor and sword from the giants treasure room, return them to Tyrexaus, and report back to the hill giant king. However, to get the most of this quest including a bunch of experience points, steal the stuff as just described, sneak back out of the stronghold, use the sword and armor to kill Tyrexaus, then return the stuff to the hill giant king. By the way, Tyrexaus has a lot of really good stuff in his treasury. After this, return to the Mage Guilds Tower and get promoted to Wizard.
To reach the rank of Master Wizard, you need to learn all of the level 7 mage spells from places around West Zinlasiad. I will simply list the towns in which you can get these spells and explain them more completely in each town as I encounter them.
Shockwave – Ruins of Shrin Lakka
Major Blessing – Ruins of Shrin Lakka
Mass Paralysis – Ruins of Shrin Lakka
Protection – Ruins of Shrin Lakka
Major Summoning – Lucinda’s Manor
Force Barrier – Tree House
Quickfire – Cave of Tyrexaus
Death Arrows – Ruins of Shrin Lakka
Once you have all these spells, report to the Master Wizard. He will then say you can challenge him for the right to lead the Guild. If you ‘accept’, then you will go to the Arena to duel with him. If you win, you get experience points and become the new leader of the Mages Guild. If you leave the arena without killing Lysandros, then he will ridicule you and you won’t be able to challenge him again.
Their temple is located in the northwest part of West Zinlazia on the north fork of the west road. The priest at the altar can sell you healing. Talk to Brother Timothy, in the western most room for your first quest.
You are assigned to get a stick used by the troglodyte shamans. This stick is located in the Troglodyte Caves a little ways southeast of the temple. In order to get the stick, you need to go up the central corridor of the caves to find a log you can move. You may want to clear the area south of the log before you move it. The log will then move all the way to the east. Go back around the eastern side to move the log to the middle path. Once again you will want to clear the caves and the treasure room south of the eastern path before you move the log. Now backtrack and go up the western side of the caves to cross the log and get the stick from the chest at the end of the path. Return to the temple for your promotion and reward. Brother Timothy will give one of your PC’s some skill points. Sister Theresa next door will sell you all the level 4 priest spells and give you your next mission.
You are now assigned to find and destroy the troglodytes altar. The Troglodyte Hall is north and east of the temple. Go there approach the rock and shove the stick through the hole in the rock. You will be let in. Kill a few troglos, enter the shrine, cast Ritual of Sanctify on the altar, and return to the Priest Guild for your rewards; the rank of Acolyte and some skill points. Go to the other side of the temple to talk with Father Zacharia, who sells all the level 5 priest spells and gives you your next mission.
Head into slith lands west of the Mage Guilds Tower. On the western side of the island, to the south is the Slith Fort. You need to fight your way to the southeast corner of the inner area to kill the slith chief who has a key that allows access to the ramparts around the fort. Work your way around to the west side of the fort to a room with a couple of treasure chests in it. In one of the chests is a map the sliths have made. Get it, and return to the Priest Guild. Father Zacharias cannot decipher the map, but he will give you your rewards anyway; more skill points, and the rank of Disciple which allows you to go see Mother Catherine. She will teach you all the level 6 priest spells and, after deciphering the map, will give you your last quest from here.
You must now go to the sliths temple, located a little ways north of their fort, fight a few sliths, enter the shrine and cast Ritual of Sanctify on the altar. There is a way to go around all the slith guards and priest to get to the altar from the rear, but why give up earning so many experience points? Besides, once you destroy the altar, they will attack you anyway. I suppose the reasoning is that you want to do this spell point expensive task before you take on the mob, and try to escape down the tunnel through the priests quarters. There is also a cave in the back of the temple area where you can fight some more sliths, and get some treasure. Opening the door at the rear gives you easy access to this dungeon directly from the outside. Return to the Priest Guild for your rewards; more skill points, the rank of Curate. You are given one final mission to achieve the rank of High Priest; you must go see Father Antos at the Priest Guilds Mountain Retreat.
The Mountain Retreat is at the end of a long mountain pass to the southeast of the Priest Guilds Temple. There is a Book of Learning in the library. Talk with Father Antos about ‘mission’. He will tell you to go to Katarack Island to the northwest to seek out a mage Lucinda who is doing evil things. He will also give you an amulet you can use only once to get past the magical barriers at the entrance to her manor. Head back to the slith lands west of the Mage Guild’s Tower and head to the broken bridge at the northernmost tip of the island. Fly across the gap onto the island there (you need to have completed the Mage Guild Quest #4 to get the Flight spell). Go to the manor and go in to meet Lucinda. As you cross the great hall, you will be attacked by the chairs. You must kill them all to be able to pass the doors at the other end of the hall. Head out the right door. Search the chests for a piece of a medallion. Go back to the main hall and head out the other door. There is a Tome of Knowing (+2 skill points) in the library. There is a lever in one of the bookcases that opens a gap in the back to reveal a door. If you do this now, you will face a witch of incredible power and 2500 health; almost impossible to kill. Killing her will solve the problem, but there is an easier way which gets you better rewards. Go out the library through the north door, and check the rooms off this hall for another chest containing a second piece of the medallion. Going through the kitchen triggers a cauldron attack, but you can get some energy potions from the cauldrons once you kill them. From the northwest room follow the hallway east avoiding the teleport traps to get to the northeast room. Here you can learn the 7th level Mage Spell Major Summoning. From here head south down the east hall to find another chest containing the third and final piece of the medallion. Oh by the way, did I mention that the chests containing the medallion pieces are guarded by golems? Or that the unguarded chests attack you if you search them? Now work your way to the garden in the center of the manor. Fight a few trents, and go to the door leading to the source of the problems here. You will need to use one of the medallion pieces to join them together. Go down the hallway, killing living statues as you go. This altar you just have to kill by beating on it. Watch your back as demons will keep appearing to hurt you as well. Once you have killed the altar, return to the library, go through the secret entrance through the south bookcases and talk with Lucinda. As a reward she gives you a ring of Magic Protection. Return to the Mountain Retreat for your reward; experience and five of the 7th level priest spells.
You’ll have to find the other three on your own.
Revive All – Shrin Lakka
Divine Thud – Underground (when kill Dr. Biespew)
Avatar – The Ruins of Shrin Lakka
Now let’s start in with the Alchemists Guild. Follow the road from the river to the east and take the north fork to The Farm. The classroom is in the center of town where you have to pay 50 gold to get into the induction class. Once in, you get a briefing about the goals of this set of quests. Along with this lesson you get a level in alchemy.
The first quest you get is to find some glowing nettles. Talk to the other characters in the class. One of them, Ivan, sounds like real trouble. The instructor, Ming Lu, is also a trainer. Head to Independence City, rent a boat, go to the island, get some glowing nettle and return to the classroom at The Farm. Talk with Ming Lu and say ‘glowing’. You get lesson two and another level of alchemy.
Now you must look for graymold. As you leave the valley, Ivan comes up and tries to talk you into cooperating with him. Remember the hut I mentioned earlier, just west of the Farm? Now it is occupied and you can buy 20 food for 5 gold; cheep!! (I mean cheap.) Anyway, head south again to Lancaster Valley and go through the Stockade into Nephilim lands. From the Stockade, follow the mountains to the northeast to the Hydra Cave. The graymold is just inside the entrance. Go on in and clean house while you’re at it. Return to the Farm and say ‘graymold’ to Ming Lu. Take a seat, get more training and your third assignment.
To find the Ember Flowers, head back to the nephilim lands, and head SW. The ember flowers are in the middle of the swamp at the tip of the peninsula. Get some and head back to the Farm. On the way, Ivan ambushes you and demands you to give him your ember flowers. Answering with either response lets you keep your ember flowers. What is up with guy, anyway? Say ‘ember’ to Ming Lu and take a seat. More training and a new quest.
Now you must search for asptongue mold. That means another journey to the slith lands west of the Mage Guilds tower. The Icy Cave is in the mountains just north of the slith village in the southern portion of the island. This cave has all sorts of icy monsters (surprise!) to clean out. Work your way to the back of the cave to get the asptongue mold. You will also find the body of Dr Crandall. When you leave the cave, Ivan ambushes you, for real this time. Head back to the farm and claim your reward. One of the benefits is that you can store stuff in the house reserved for you.
To earn the rank of advanced alchemist, you will have to complete one more quest. You must get four mandrake seeds and plant them. This is such a difficult quest you may want to wait until you have completed the Mage Guild and the Priest Guild phases. To find the seeds you must go back into the Nephilim lands, to the far south and invade the treehouse of the Rakshasas (I told you this would be difficult). Once inside the treehouse, you don’t want to leave until you have all four seeds. This is a fairly complicated maze of rooms and stairways, so I’m not going to try to map it out. You can find one of the seeds on L1 at 13,8. The second one on L2 at 31,13. The third and fourth ones are on L3 at 13,16 and 35,26. Also on the first level at is a library where you can learn the mage spell force barrier and the alchemical recipe bliss. You can only get here via a portal the other end of which is on L3. To get to that portal you need to get the rakshasa key from the elder rakshasa on L3 21,9, find two colored objects; a glowing red orb (L2 12,40), a blue cube (L2,36,40). Once you have found them, use one of them to combine them into a glowing purple cube. This is the key to the door that conceals the portal just outside the door where you killed the rakshasa elder. By the way, you need to have a cumulative mage lore of 20 to read the book on force barrier. Once you have all the fun you can stand and you have all four seeds, head back to the farm. Go into the house reserved for you and plant the seeds to complete the quest. To plant the seeds, simply drop on the dirt patches in the back yard. Come back in a few days for them to sprout. When you return, you will be promoted to Expert Alchemist. You can continue to use the house here for storage, plus they will now sell you reagents for potions in the greenhouse.
The Thieves Guild hideout is on the other side of the river at the extreme north end of West Zinlasia, in a dungeon called the Dark Cave. Talking to Elton at the front door will get you nowhere. You need a password and he won’t tell you. Go around to the back and break in through the cracked wall. You will be greeted with a message that tells you the password is ‘Brundig’, and to seek out the four top members of the guild to get missions to perform. Only then will you be permitted to see Montague. Quinn is in this room and you can receive training from him.
Outside the trainers room to the west is the mess hall. Cookie will sell you rations and thieving supplies as well as buys anything you may want to sell. On a final note, once you have been here, your thief friends on Hollis Island will be dead.
In the main room you will find the four top members of the Thieves Guild. Ask each one about ‘nomination’ and they will give their mission. Harry wants a ring returned that he gave to someone named Beth in Independence City. Clint wants his sword returned that he lost to some sliths. The sliths live in the southwest at the tip of the peninsula. Jezelle wants a sapphire necklace from the jewelry shop in Independence City. Johnny wants you to steal the spotted gecko from the Independence Zoo. Before you go back to Hollis Island, talk to Cookie and buy the ‘Master’ Lockpick.
First let’s head into Lancaster for the necklace Jezelle wants. Ask the jewelry shop owner about ‘sapphire’ and she will ask how you know about it. Answer number 2 is correct. She will tell you that Jacob, the retired jeweler has it. He will send to Mr. Simms. Back at Simm’s Manor Lancaster Simms refuses to part with the necklace. It is hidden well, he says. Keep pressing him and he will indicate that he has a preference for Independence ale. We can get this from the Dungeon Bar and Grill in W. Independence. Get five bottles of the stuff and return. When you get in the door, let him have all of it. He will open the secret door to his wine cellar. Go down and search the bookcases for a switch that opens another secret door. Be careful exploring around here; there are quickfire traps behind many locked doors. Use True Sight to check out what is behind a door before you open it. Head down the passage to the right and turn south until it dead ends with an opening to the east. Follow the twisting passage, triggering several unavoidable traps until you come to the skeleton on the floor. There is a secret passage to the east you want to use to avoid setting off a quickfire trap. Follow this passage to the south and look for a secret door in the south wall. The eastmost treasure room is an emerald necklace. The next room to the west contains the sapphire necklace you are looking for. The main treasure room is around the corner, through a locked door and a secret door. Before you enter it though, you need to disarm another quickfire trap by pulling a lever in the east wall of the passage near the first treasure room. Make sure you open the correct door because one of them is holding back some quickfire. Loot his treasure room, and leave. Don’t forget about the quickfire trap in the long winding hallway on the way out. Return to the Dark Cave and ask Jezelle about mission to complete this quest and receive one nomination.
For my second quest, I went after the ring Harry wants. We could have done this while getting the ale for our previous quest, but for this walkthrough I am making extra trips. Recall that someone named Beth Stanley lives in the Residential Area of Independence City. Let’s call on her and ask her about the ring. She tells you she may have lost it in the Tourist Center, but it is closed now. Good thing we now have a master lockpick, or we’re not going to get in there. Head into Independence City to the tourist center. When you try to open the door the guard will stop you and ask you to tell him what you are doing. You’re going to have to bluff your way in. Talk to the guard and say ‘doing’, ‘stan’, ‘mayor’, ‘commander’, ‘dinaarch’. Go back to the door and go on in. Search behind the counter and you will find a note saying that the ring is now in the U-Store it. Head back to West Independence. Search the chests in the storage rooms for the ring. Return it to Harry for your second nomination.
The third quest I did was the spotted gecko. The Independence Zoo is just northwest of Independence. Use your master lockpick to get through either of the doors on the south corners of the zoo. Go around behind the reptile house at the very back, and go in. The spotted gecko is in the last cage, but when you pull the lever to open the door to get it, all the doors open. Reach in and get the gecko and fight your way past all the other nasty lizards. Return to the Dark Cave and get your third nomination.
The fourth quest for Clint’s sword. From the Dark Cave, go south to the road and follow it past the Mage Guilds Tower to the far western part of West Zinlasia. When you cross the bridge to the Sliths territory, head south. Keep in mind that this is very dangerous country. It may take you a while of going in, exploring, getting beat up, leaving to rest and coming back for more. On the plus side, you will gain a lot of experience here. Take time out to get training when you feel the need. Along the way you will find a slith fort in the middle of the island. Take it out if you want, but there is more to do here which we can’t do until later. There are three slith villages at the south end of the peninsula. The western one has the sword hidden in a crate in the building on the east side of the town where the slith chief lives. Get it and return to the Dark Cave for your fourth and last nomination.
Oops!! It seems that after all this, Montague wants you to complete a quest for him before you can become a member of the Thieves Guild. You must find a place called Gumby Island, somewhere off Hollis Island, and steal a portrait of one of them. By the way, you want to do this without killing any gumbies. He mentions that you may need a boat to get from Hollis Island to Gumby Island, so let’s head back to the Ferry Landing there and see if we can get passage to it. It will cost 1000gp to get there, but Captain Eddy will get you there once you board the ferry. Once you land, head north to Gumby Village. The Gumbies are not very talkative. In the Gumby Library there is a book in the northeast corner that tells the Gumby history. In the center of a group of bookshelves in the center of the library is a book that teaches the recipe for Knowledge Brew. In the north wall of the north room in Gumby Hall, there is the Gumby portrait that you want to steal. However, the Gumbies in the room will not move; if you steal the portrait, of course, the town becomes hostile, and then you will have to kill some Gumbies to get out of town. So how to steal the portrait without being seen? There is a secret door just east of the portrait. Go into the room behind there, search the barrels for a magic mace, steal the portrait and leave. Upon leaving Gumby village you will be attacked by blockheads. These are OK to kill. Once you return to the Dark Cave and give the portrait to Montague, he gives you a ring that will enable you to do business with other members of the Thieves Guild. Remember the hut in Meikaprr forest we passed by earlier? We can now buy cheap food from there. There is also a tower north of the Mage Guilds tower where you can buy magic stuff really cheap. By the way, if you want to look in the back rooms, beyond the traps, there is a treasure room with some good stuff, but you won’t be able to get it without getting caught. Save this for one of the last things you do before leaving the game.
Now that you have done all the skill building you can, it is time to finally find out what this story is all about. On West Zinlasia, head south of Lancaster back into Nephilim lands. To the west of the entrance on the south side of the mountains is a Slime Cave you can explore just for the fun of it. Another place to visit is the Dark Forest to the west of the Rakshasa’s Tree House. Go through this town, fight some Rakshasas and Trents, leave to the west to retrieve an Amulet of Magic. The Nephilim Cave is to the south of the stockade. Here is where we can pick up the thread of the story. When you walk into the passage to the left of the entrance, you will be confronted by the Nehpilim. Listen to what their leader tells you about the problems on Hollis Island. You will be given a quest to return the leaders granddaughter to them.
Meirinkiprr lives in West Independence City. Go there. When you approach her shop, Grover will run up to you and deliver a message from Mrs. Brundy about another quest for you; to get a fur coat being made for her by Trapper Hank. Talk to Meirinkiprr and tell her about the ‘danger’. She will go away to do one last task before she leaves; you can meet her at the courthouse later. You may as well go to the hunters lodge to finish Mrs. Brundig’s quest now. When you get to the trappers lodge, you discover Hank is dead. Return to Mrs. Brundig to report.
Now head back to the courthouse in Central Independence. Go into the courtroom, walk north to hear the events of the trial. Talk to Meirinkiprr and say ‘leave’. She will come with you as a special item.
Head back to West Zinlasia. When you try to go through the stockade, you will have to fight your way through once Meirinkiprr is discovered. When this happens, you will lose Meirinkiprr. You will also now be able to loot the supplies room for some good stuff. Open the gates to the south using the lever in the guard room, and go to the Nephilim Cave. Now you have to find Meirinkiprr. She is in the Slimy Cave to the west of the Stockade. Work your way around until you find the Giant Slime. Kill it to get to where Meirinkiprr is trapped, get her and return to the Nephilim Cave. When you enter the hut where her grandmother lives, you will be told the tale about the presence. When she is done, you know to head back to Independence City to talk to Crazy Bob. As you leave the cave, you will be intercepted by one of Grover’s pigeons inviting you to the grand opening of the Coloseum.
You can look at the complete Coloseum when you get back to Independence City. Nothing of value here at all though. When you get to Central Independence City, you will notice that Crazy Bob is not in his usual place. Head to the Medical Center. You need to talk to Dr. Beispew to get permission to get into the psych ward. There you will find Crazy Bob. Talk with him and you will get a clue that Mrs. Dawson knows something about what it is coming up from below. She is not at home, but from what Crazy Bob says, you get the idea to head to the Bayside Resort, hiding with the fishies. Make sure you ask him about the ‘fishies’. Head there.
When you get to the Bayside Resort, head to the Undersea Grotto from the restaurant area. There you will find Mrs. Dawson who will tell you what she learned from her husband on the day of the trial. Back to East Independence to the jail. Talk to the guard to be let back into the cells. Search the back wall for a secret door, then head down into the dungeons. When you get to the last cell on the left, you will find the body of William Dawson and the first four numbers of the combination to the door in the psych ward (6738). You will also have an encounter with Warden Stinam. Fight your way out of the cells. When you get back to the main cell block, you will have to unlock the doors leading to the watch guard. Kill him, and then escape through the window. Head for the Psych Ward in the M