@ the Shadowvale CSR
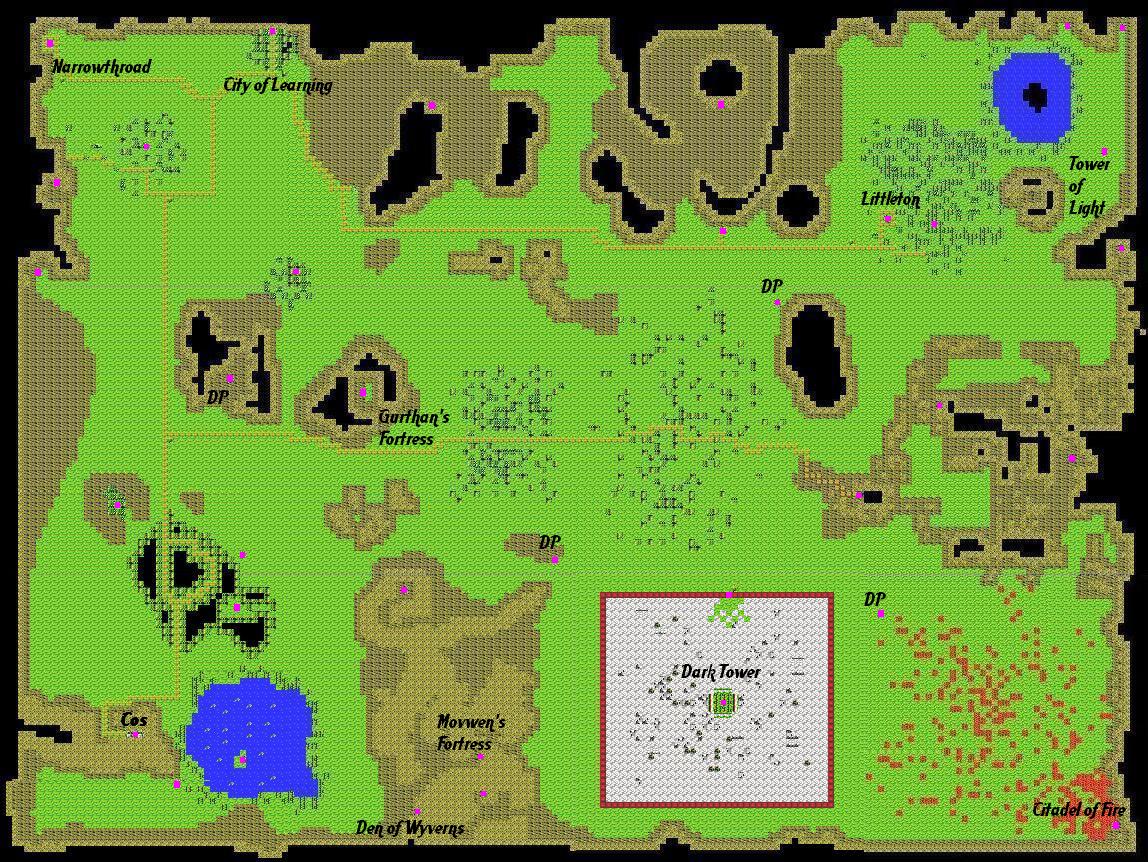
Outdoor Map
by Jewels
Map of Demon Maze
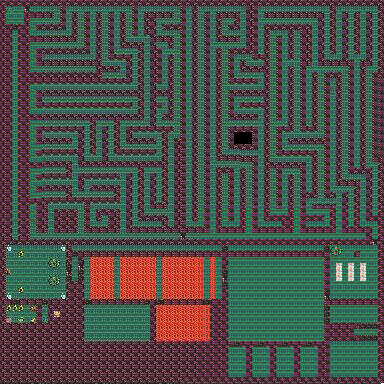
Map of Mowven's Castle Maze
Hints
by Author
Complete Walkthrough
by Jewels
Side Quests/Dungeons
Outdoor Shops
First, you need to find the Tower of Light. This is not that difficult. There are two ways to do this. Either visit the wizard in the Library Town, or the one in a hidden chamber in Narrowthrode. Each one has a different requirement. The one in Narrowthrode wants an artifact from the Tower of Magery. Gain admittance by paying the mayor 2000 gold (It's well worth it, even if you don't choose to give the artifact to this wizard.) You should have gotten the password from that wizard. Once in, find the keypad to open the control room, and enter the combination. The button you want is on the left. (You may want to experiment to find out what the other buttons do, but they are a bit more risky.)
Note: You probably want to obtain Firestorm and Dispel Undead before entering the Tower of Magery.
The other route is a bit easier. Simply pay the wizard in the Library Town 10 thousand gold, and he'll tell you where the Tower of Light is. (Of course, if you actually have ten thosand, there are better things to spend it on. I'd advise finding that artifact instead.)
You then have a trip ahead of you. You'll probably have to run from most monsters for now, but you should be able to reach the Tower. There, you will be given a series of quests, and finally reach Mirarn. In order, these quests are as follows:
1. Deal with the swamps. Not too hard, just kill one wizard. That is, one wizard surrounded by zombies and various swamp creatures. Okay, a bit challenging, I guess. To make it a little easier, enter from the east. Also, there is some gold in this swamp. Get it.
2. Sanctify an altar. Obviously, you'll need someone to be able to cast Ritual of Sanctification. Actually, you'll need to cast this several times in this scenario, so you probably want everyone to be able to cast it. The altar is under a tower to the north (from the Tower of Light, that is) It's fairly heavily guarded, but with a little patience (And some kill spells) you should get through.
3. Kill Gurthan. Go to his fortress (Obviously), and work your way through it. Be warned, wrong steps will dump you in nasty places. Find Valram, talk to him, and learn how to use Gurthan's portal. Find the amulet he mentions, use the portal, kill Gurthan. Oh, and assorted demons along the way (Unless you'd prefer to let them kill you :)
Once you reach Mirarn, he'll start giving you missions. Be sure to get all the assorted goodies he has for you.
Your first mission is to kill Urven. Her fortress is in the Southeastern corner of the world. This is a straightforward battle. Enter the fortress, fight to the central room, kill Urven. Oh, and be careful about stepping on those runes near Urven, they'll kill you if she's still alive.
Then, return, and go through the hall of testing (Aranar portal.. Those rewards are VERY worthwhile. Once you've done that, talk to Mirarn and get your next mission, to go stop some golems (Sound familiar? :)
This is complicated by not knowing where the golem tower is. First, you need to go to one of the two small huts in the western part of the world. You'll be told to retrieve part of a sword from a cave of wyverns. This is a nasty series of battles. I strongly advise caution. Once you have the blade, go back to that hut and get the hilt. Then take them to the other hut to have the sword reforged. Once that's done, go back to the first hut (Again!) and find out where the Golem Tower is. Go there, fight your way to the top (Not too hard) and kill the Golem Master (Impossible unless you figure out the secret. (If you can't figure it out, it's in the solutions section.))
Then go to Cos (You've probably been here before.) Find the king. (Hint: SECRET PASSAGE)
Get your reward, and return to the Tower of Light.
Go talk to Mirarn (Sorry, no teleporters here, you'll have to climb the stairs. Before going to see Mirarn, I suggest you revisit Aranar, and go through the second portal. I know, its getting tiresome.) When the ring is stolen, you'll have a few days to retrieve it. Fail, and you lose. Find Movwen's fortress (Near Cos), fight through it, and kill Movwen. Congratualations, just three big guys left to go! You're halfway done!
Return to Mirarn, and he'll give you your final instructions. The only thing you have to do is to kill Moaran, but doing everything else will make this much easier.
I suggest hitting the Temple of Demons first. The last enemy here is another of those "Invincible unless you guess a secret" types. It shouldn't be too hard to guess, at least, not as long as you've been searching every bookcase you find. If you can't guess it, that's also in the solutions. That done, leave, looting first. (There are three places you'll want to loot. First, there is an exit to the right in that last room that leads to a trophy hall. Take the trophies. Oh, this place is full of Haakai, so be sure you're ready for a fight. Then, search the wall right behind where that last enemy stood. Finally, there is a treasure room hidden in the wall on your way out.)
Then, go through and get rid of the Dark Gates. These take four Rituals, so be sure you have plenty of spell points. Certain special items can be helpful here. If you don't get all four, Moaran will have a several demons with him, and that battle will be almost impossible.
At some point, you may want to get the Scepter of Might. This is absolutely NOT necessary, but it will make your life a bit easier. I'll leave it up to you to figure out how to get it. (If you really can't figure it out, e-mail me (e-mail address in contact info) Keep in mind that I'm usually fairly busy, so don't expect quick responses.)
Finally, you need to deal with Moaran. Fight through his tower, and eventually you'll reach him. Kill him, and, if you still have the Blade of Power, you win. If you don't, you might win, or you might not. Just don't lose that blade. I repeat, DO NOT LOSE THE BLADE OF POWER!
Some Solutions:
SPOILER SPACE
SPOILER SPACE
SPOILER SPACE
1: Tower of Magery combination: 421536
2: Kill the Golem Master by destroying the crystals in the room.
3: Kill the Nalfashnee with a Ritual of Sanctification (Trust me on this one, it will work.)
4: Answers to Aranar's riddles (In no particualar order): e, tommorow, stars
BTW, I will not give the answers to the test riddles. The rewards there are exceptional, and I don't want to make those too easy. (The riddles shouldn't be that hard anyway.)
5: Various 3x3 rooms w. 3 gates. Sorry, but I can't help with this. I'm a little annoyed by those. I'd worked out exactly how to set each one up for a specific pattern, but somehow when I test them those patterns don't work. All are passable, but you'll have to get through them entirely on your own.
6: The Dark Tower, passage to L5. Visit all four segments of L4, pull the levers there.
7: Everything else. I think that's everything that might not be obvious. If you think I should add something to this file, LMK.
Portal Grove
Narrowthroad
City of Learning
Tower of Light
L1
L2
L3
Halls of Testing
Littleton
Swampy Field
Dark Fortress
L1
L2
Gurthan's Fortress
Ruins
Citadel of Fire
Cos
William's Small Hut
Den of Wyverns
Michael's Small Hut
Golem Tower
L1
L2
L3
Fortress Gate
Fortress of Movwen
Temple of Demons
Dark Gate 1
Dark Gate 2
Dark Gate 3
Dark Gate 4
Gateway Fortress
Dark Tower
L1
L2
L3
L4
L5
L6
L7
Goblin Outpost
Cave of Giants
Necrath Outpost
Valley of Death
City of the Vahnatai
Cavern of Life
Death Caverns
Stone Caverns
Cavern of Horror
Pit of Dread
Pit of Despair
Halls of Destruction
Cave of Power
List of Outdoor Shops
You start in Portal Grove. Go west and talk to Aremele. She can train you and tells you where to get supplies and horses.
Go north to the Chapel of Light. Marian can heal and identify for free. Do not confuse her with Mirarn who is the one who called you here.
Go southeast to the storage building. At x28, y22 there is a portal to take you out of the scenario. Take all the items in the storeroom.
Go south of the building to find a horse. You are now ready to leave Portal Grove.
There is no real direction given in the scenario as to where specifically to go next but you are supposed to find the Tower of Light, which is hidden until someone tells you where it is. There are two ways to learn the location. One is found in Narrowthroad, the other is in the City of Learning.
NE of Portal Grove. At x27, y53 there is a secret door to a small room with the wizard Malthus. He asks you to retrieve an artifact from the Tower of Magery for him in exchange for the location of the Tower of Light. He also tells you the password: POWER. You may then go to the mayor and pay him 2000 gold for permission to enter the tower. Don’t go to the door and say the password if you haven’t paid the mayor for permission. It will kill you. If you don’t have the money for permission or don’t want to spend it, at x40, y53 there is a secret door that leads into the Tower of Magery bypassing the password and the need to spend money to get in but the floors of the hallway shock so if time and health is more important to you then money, you may just want to pay the mayor.
Once in go up the stair in the center. Find your way to the control panel. Read the inscriptions to figure out the combination. There is another place to find the combination also but it is not found till much later in the scenario. Since this is a walkthrough, I’ll tell you the combination is 421536. To the north the porticuls opens up and there are three buttons to press. The one on the left will open up only the area with the artifact, the Bar of Flames. It says it is usable in the special items list but I am unable to discern its use. The second button will cause two guardians to appear and open up an area with two spirits and a Blade of Light, which is a demon slayer. The third area will cause three demons to appear and open up an area with a lich and two chests. One with 2000 gold, the other with 2000 gold and a Ring of Speed.
Now that you have the artifact you may give it to Malthus and he will tell you the tower is to the East. (Plus you’ll be able to find it even though it’s in the middle of an open field and you should be able to see it without someone telling you, but that’s a bit of story illogic of which there is much in this scenario.
Also in Narrowthroad:
There is an inn where you can rest a night 3 gold and get Extremely Cheap provisions. At x52, y11 there is a secret door that leads to a bookshelf. On it are two Scrolls of Kill. The door at x52, y25 is magically locked. Get the wizard to leave the room and close the door behind him. You can now take the Helmet of Alertness in the chest and the Scroll of Kill in the desk.
There are many things you can take on the shelves of the libraries. At x28, y47 there is a Scroll: Fireball, x25, y45 there is a Scroll: Kill, and x23, y47 there is a Silver Ring of Protection. At x13, y53 there is a Silver Ring of Weight, and at x15, y53 there is a Ring of Warmth. At x17, y41 there is a Scroll: Firestorm. Everything else in the library/storage is ‘not yours’ with many watching eyes. Steal at your own risk.
In the market you can find training, Expensive iron weapons, healing and a junk shop. There is also an Amulet of the Cobra hidden at x10, y16, and Boots of Speed hidden at x26, y30.
If you don’t want to use that time and have 10000 to spare you can skip Narrowthroad and go to the wizard in the City of Learning. Ask him about the ‘tower’ and he will tell you the location for his fee. You can also gain some general knowledge (Mage Lore or Intelligence?) hidden at x12, y30 in his room.
Also in City of Learning:
You can buy Expensive magic weapons and also find a Venom Sword hidden at x13, y32 in this shop. Behind the weapon shop is a junk shop. There are many items in the storeroom. Steal at your own risk. You may buy a room at the inn for 20 gold and find a Silver Ankh, Gold Serpent Ring, Scroll: Magic Res., Sapphire, and an Emerald in the rooms. There are Expensive level four priest spells and healing in the Temple of Light. Perhaps a clue to ask Mirarn about ‘darkness’. In Farseth’s Potions you can buy Expensive weak potions as well as Ambrosia and Potion of Bliss. You can also pick up the Wormgrass and Comfrey Root without stealing it. You can buy access to the Library of Magic from Sandre for 3000 gold. For your money you will learn Poison, Ice Bolt, and Slow Group and pick up a Bronze Serpent Ring as well. Worth it? …probably not. If you want you can dispel the barrier at x40, y35 go south through the next barrier to talk to the mayor. There are three scrolls and two wands in this room. Steal at your own risk.
Now that you know the location of the Tower of Light, lets go there. Straight east - relatively.
L1:
First you talk to Melore. She gives you a mission to help a ‘town to the south’ (it’s actually more to the West) in order to advance.
Also available at L1:
You may buy Expensive alchemy recipes, Somewhat Pricey magical items, and Pretty Average Blades (flaming weapon) and Blades of Light (demon slayer).
Talk to the mayor about his problem and he tells you to stop what is causing the swamps. When you return he gives you a reward of 1000 gold and an Amulet of Hiding (sanctuary).
Also in Littleton:
You can receive healing, buy the alchemy recipe for Strong Power at Utterly Ridiculous prices, and buy magical gloves, boots and shields at Exorbitant prices from the other council members. There is a secret door at x26, y19 where you can enter a ‘tool’ shop. You can stay a night at the inn for 80. I suggest not even talking to the innkeeper because she doesn’t tell you how much the stay is and takes your money without warning. You can buy iron and a few steel weapons for Exorbitant prices from Gera and all the other areas are behind impenetrable doors.
Kill all the undead and enter the building in the center. Kill the swamp master and return to Littleton. Find ~1000 gold at x9, y18.
Return to Littleton for your ‘reward’ then return to the Tower of Light to ‘ascend’. Climb the stair at x7, y24.
Go speak to Falmirin (NE corner room), she will tell you to go cleanse the altar to the NW.
Also available at L2:
You can learn Revive All Extremely Cheap from Ameloh, Heal All and Revive Extremely Cheap from Amel, level five priest spells Very Reasonable from Firarnin, level six mage spells Very Reasonable from Ilto, and level five mage spells Very Reasonable form Iltor. From Corven you can get level four mage spells, some medium and some strong alchemy, many ingredients, strong potions, and many magical tools/items all at Extremely Cheap prices.
L1:
Go through secret doors at x15, y23; x15, y20; x21, y18; x18, y11; x15, y13; and x11, y15 battling monsters along the way then go down stairs at x17, y17.
Kill all monsters, go to the room to the north, kill the two Dark Angels and sanctify the altar. Return to the Tower of Light.
Ask Falmirin about ‘visit’ and he will give you a pass-key to Arwnel’s room. Here there is a bug in the game. If you go to Arwnel’s room, the first time you try to enter it will tell you that you can’t. If you try again the door opens right up. There is some dungeon you are supposed to play before trying to enter but I don’t know which one, and you are not given any direction as to which to play. Since it doesn’t seem to matter go on in. She will sell you level six priest spells at Pretty Average prices. She also tells you to go West the Gurthan’s tower and kill him.
Enter from the West. Do not open the second set of doors. Instead find the secret door to the north and go through the portal there. Do not step on the dots or take any of the items on the shelves. This is the ‘Library of Evil’. Go north and step into the forth portal (the one on the right). Do not step on the special right north of you, instead go east and north then cross the special at x55, y21. Go through the magic barriers, don’t dispel them, then go through the portal. Go SE and unlock the door on the left. Talk to Valram till the conversation ends, then go north, prepare for battle and go through the portal/special at x45, y37. Fight the monsters north and go through the portal, fight the demon golems and go through the portal, and go south through all the traps and through the portal. Kill the Hell Wyrms and go through the portal, kill the monsters and go through the northern portal, kill the demons and go through the portal, kill the demons, search the NE altar for the amulet then go through the portal. Take a breath. Go to the room in the NW corner, prepare for battle and go through the portal. When Gurthan is dead go through either portal and leave the dungeon. After the tower crumbles go back into the ruins.
There is only one thing here of interest. Go to the SW corner where the Library of Magic was and look at the book on the pedestal. Then search the bookcase to the right to find the record book. Go into your Special Item list and ‘use’ the records to read them. It is at the end of these records that we find the combination for the Tower of Magery though it is not stated as such, just left there for a person to wonder about.
Go back to Arwnel at the Tower of Light and she will give you the Orb of Passage to move up to level 3. Go up the stairway at x7, y7.
First talk to Valrim to get instructions. Then go to the center room of the level. From there you can go to either the throne room on the left or the shrine of light on the right. I suggest the shrine of light. Go up the stair and you will be asked three questions. The answers are… stars, e, and tomorrow, though the last one seems to work with any answer. Once through, cast Firewalk and go across to talk to the dragon. Ask him about ‘world’ and he will ask you what your world is like. Answer honestly and he will reward you with a special item that is supposed to aid you, but as far as I can tell, it doesn’t work. Ask him about ‘fighting’ the darkness and he will sell you a number of custom magical items. My favorite is the Mind Stone, which takes the place of 25 Smoky Crystals. Enter the northern portal and read from his books to learn things about how to kill your enemies and where they live. You cannot enter the southern portal.
From Kayla you can learn 5 level 7 priest spells and she will identify for free. Mirarn will teach you level 7 mage spells Extremely Cheap. Ask him about ‘heal’ and he will give you a rod of healing, ‘strength’ and he will give you a rod to restore your magic, ‘flight’ and he will give you the Orb of Flight which lets you fly for 12 turns, ‘weapon’ and he will give you the Blade of Power which you need to defeat Morarn in the end, and ‘smite’ will get you a rod of smite to attack your foes. You must ask him about ‘order’ to advance in the game. He will tell you to go kill Urven, mistress of fire who lives to the South.
This is a very straightforward fight. Make your way to the center building to kill the Acolyte in the middle. Don’t step on the runes around her. They will kill you. If you have Firewalk, it is very useful here. Stealth and Major Blessing also aid in this fight. When you are done return to Mirarn and ask about ‘number’. He will tell you to go across the hall to the teleporter again and it will take you to tests instead of the dragon. There is a bug in the game where if you do a certain quest first, the teleporter will take you there before this dialogue shows up. Some SDF used twice I’m sure.
Test of Warriors:
Answer to riddle – love. Fight the bad guys, take the blade, look at the altar, get rewarded.
Test of Will:
Walk through to the other side, look at the altar and get rewarded.
Test of Knowledge:
Riddle one – dozen. Riddle two – 52. Riddle three – darkness. Riddle four – the ocean. Don’t forget to pick up a ring and potion from the boxes.
Test of War:
Walk through to the other side, look at the altar and get rewarded. You can kill the beasts if you want to but it is not necessary. Three people can go through to receive this reward.
Go back to Mirarn and tell him of your ‘tests’. He will tell you to go to Cos and help them.
To advance the story, first go to the secret door at x55, y25 behind the park. Go through the locked door and up the stairs and talk to the king. He gives you the ‘task’ of curing the golem problem. ( But he doesn’t tell you where to look) The person who knows the location of the Golem Tower is in a hut north of Cos.
Also in Cos:
Seth the priest will heal Somewhat Pricey and identify for 8 gold. In the Grand Market, Nicholas will augment your weapons by blessing them, making them flame weapons, or enchanting them. He will also buy your extra items. Nichos sells Expensive magic weapons and Exorbitant magic armor and mithral armor Serenla sell Very Reasonable weak potions. Adriennne sells Expensive scrolls and other magical items. Carlos sells Expensive steel weapons. Grant sells Expensive tools. Aaron teaches Somewhat Pricey level 4 and 5 mage spells. Clayton teaches Pretty Average level 4 and 5 priest spells.
In the library there are scrolls on the shelves at x25, y36; x26, y43; and x24, y41. Talk to the librarian for access to the ‘mage’ library for 2500 and access to the ‘restricted’ library for 5000 more. In the mage’s library there are many scrolls to steal and you learn Mindduel. Walk through the bookcase to get it. Go through the secret door at x16, y24 to get to the restricted library. There you learn Mass Paralysis, Quickfire, and Word of Recall.
Enter and ask William for ‘help’. He will send you on a quest to retrieve his broken blade from a Wyvern’s den to the South (actually SE). There is also 17 food in the chest in the north room.
Enter and prepare for battle. Kill all the wyverns then go through the secret passages at x39, y37 and x, y. Here you will battle a dragon. To find the sword go north through the secret passage x41, y21 and step on the rubble in the middle of the room. Gather your rewards and go back to William. Tell him you ‘retrieved’ the blade and he will give you the hilt. Now you must find someone who can reforge the sword.
Ask Michael of his services and he will reforge Doomcaller for 1000 gold. There is nothing else in this town. Return to William and say ‘retrieve’ again and he will tell you the location of the Golem Tower.
L1:
Make your way north or south around the winding passages until you are lined up with the front door then prepare for battle and go through the secret door to the east at x9, y16. Kill all the golems and enter the middle eastern door. Kill the demons then pull the first two levers. Leave the room and go south to the now open portcullis and go up the stairs.
Go through the winding passages and kill all the golems, kill all the golems in the big room, kill the two golems in the last hallway and go up the stair.
Follow the hallway to the door. Prepare for battle. Destroy all the power crystals to kill the golem master. Leave the room and the town. Return to the King in Cos and tell him you are done with your task and he will reward you with 2000 gold and a Flaming Sword. Then return to Mirarn. Our next task is to attack Mowven at her fortress. It is a timed event. If you do not finish in two game days you lose. You are not told where it is but that’s why walkthroughs are so helpful.
To open the first portcullis pull the lever behind the secret door to the north. To open the next set of gates go E, SE, E, NW, SE, E. Or if you have already stepped on some squares just keep in mind that the square in the SE corner will open up all three if the middle and right gate are closed when you step on it. There is a secret door (x10, y14) in the NE corner but you cannot go further from there. Instead you must pull the lever behind the secret door (x14, y10) that is straight north from the hallway you come out of after the three gates. This will open up a space in the wall to the East (x17, y13). Go to the end of the hallway and through the secret doors on the left and pull both levers. Return up the passage looking for a secret door on the right. Go through the open gate and look for another secret door to the left and pull the lever there. Go through two more open gates and prepare for battle around the corner. Find a secret door (x, y) in the NW corner and follow the hallway to two levers. The top one opens the last gate. The bottom one opens the walls where monsters wait to fight. Climb the stair.
Go through the eastern door and start your way through the maze. I have included a map for those who don’t want to waste time. There are no monsters in the first section. Once you get to the first door there are some monsters in this half of the maze. When you get to the second door, prepare for battle and go through the laboratory. There are many things for you to pick up here. Go through the set of three doors for another battle in a big room. You can skip opening all the doors to the east and south, instead go to the set of three doors on the west wall, cast firewalk and prepare for battle. Go strait west, you can skip the southern rooms. Behind two more sets of magically doors is Mowven so prepare for battle. Once you have killed her go through the SE door and check the eastern wall for a chest with 7500 gold before you use the stair. Leave the town and return to Mirarn. He sends you on your final quests.
Prepare for battle. Unlock the doors to the east and west, kill the acolytes and sanctify the altars. Enter the next door up on the left, kill the demons and pull the lever behind the secret door (x18, y51). Go through the wall that opens up and kill the demons there, through the secret door to the hallway and north. Open the first door on the right and kill the demon there then pull the lever behind the secret door (x37, y31). Keep going north killing as you go. When you get to the three gates you have to come out of combat mode to cross them. Make sure you’re ready to fight first. Kill the demon, then kill more demons and cast sanctify on the final demon. There are many items through the secret door in the NE corner. To get through the three gates start at the secret door and go E, E, E, S, S, S, N, S, E. Disarm the trap at x43, y11. Fight more demons and magically unlock many doors for the treasure. (Shield of Stars, Heln’s Horn, Cresoe’s Mace, Dragon Helm, Asera’s Gauntlets, Asera’s Shield, Asera’s Helm, and Asera’s Plate.) The exit is through the secret door in the NW corner of the final battle room with three more demons to kill. To get through the three gates start at the secret door and go W, W, W, S, S, S, N, S, W. On your way out find a secret door at x12, y34 and a treasure room with 5000 gold, a diamond, and an emerald. There is one more lever to pull behind a secret door (x28, y46) south of you when you’re at the final gate. Leave the building.
Prepare for battle and make your way through till you get to the gates. You need to pull the first three upper levers to pass the gates, starting on the left. When you get to the portal, go through it. Kill two Haakai and go through the next portal. And go through the next. Kill the monster, sanctify the portal 4 times and leave. (Don’t go through it unless you want to fight a lot of demons.)
Go through all the locked doors killing monsters as you go. Cast sanctify on the portal four times and leave.
Make you way through the maze to the door killing demons as you go. Cast sanctify on the portal four times and leave.
Prepare for battle. Make you way to the center room, kill all the demons, sanctify the portal four times and leave.
Once you have closed all the dark gates and defeated the demons at their temple you are ready to go to the Dark Tower to face Morarn.
Only go through if you’re ready. Once you pass you can’t go back.
L1:
After entering the first room go to either the NE or SE corner for a secret door out. Follow the hallway to the end then pull the bottom two levers to open the first two gates. Then go through the two gates and a secret door south of the third gate. In the teleportation room starting south of the first pillar, go NE, N, N, NE, E, E, NE, NE. Follow the hallway to another room of pillars and go through the ones at x42, y31; x41, y29; and x43, y27. Once you go through the gate it will close behind you. Pull both levers in the room and continue west and north. Press the button on the north most pedestal and find a secret door at x28, y4. Pull the top lever and follow the hallway. Find a secret door at x30, y16 and pull the lever. Go through the secret door in the NW corner of the next room. Push the button to open the gate. Pull the lever to open the gate. Go west and pull the lever for entrance to the treasure room with one Stone of Mind, one Ring of Speed, and one Ring of Will. Go east and pull the lever to open the gate to the stair you passed. Go SE for a hidden room with Armor of Might. Return to the stair.
Through the north door is the dark library. There is nothing necessary here but one of the books is a bit interesting. The other books just drain your SP. To the east is the demon laboratory. There are secret doors on the north wall that lead up a hallway to another room. In the NW corner is a chest with four strong skill potions in it. Through the west door is a maze to get to the next stair. The south door is a shortcut that bypasses much of the maze but you battle four demons instead. The stair to continue is along the south wall at x22, y46.
It’s probably easiest to cast Magic Map on this level or make your way through the maze killing the monsters along the way. There are four stairs to take and four levers to pull that will open up the final gate to take you up the final stair. There is one stair to the east that you fight through monsters to get to.
Go through either door as both will take you to the next room. Fight the demons and go north, fight the doomlords and find a secret door in the SW corner. Cast mass sanctuary on yourself and go south. Kill Morarn’s Projection and pull the lever behind the door. Go back down the stair.
The most logical second stair to take is north of the starting room. You get to it by going through the west door, taking the first north turn, going as far north as you can then going east. Follow the rest of the maze to a door. Straight north is a second door. Go through and prepare for fight or flight. One more door and follow the hallway to the end and take the stair.
L4 – B:
To get through the three gates go straight west till you hit the wall then go SE, SW, NE, E, SW. Prepare for fight or flight. Go through the locked door, follow the hallway, kill Morarn’s Projection and pull the lever behind the door. Then make your way back to the stair.
For the third stair follow the rest of the maze till you get to two doors. Take the west door and go down the hallway.
L4 - C:
This level is a straightforward maze of hallways. From the stair, go to the east and take the last hallway north. Make your way from there to a door. Kill Morarn’s Projection and pull the lever behind the last door. Return to the stair.
Go back to the corner with two doors and take the north door. Kill a few nightstalkers in a large room and go north through the NW hallway to the fourth stair.
L4: - D
This is another small maze with nightstalkers to battle. Find the door, kill Morarn’s Projection and pull the lever. Return to the stair.
Once back to L3, go south and east as far as you can go and south again. The gate will open and you can take the last stair.
There are many monsters to kill on this level but you don’t have to. Go north, take the first left, and go south again till you find a stair at x15, y15
This level is very annoying but what you gonna do about it? All you have to do is follow the hallway killing as you go. When you reach the end, prepare for battle and take the stair.
All you really need to do is kill Morarn in the center of the room to win and end the scenario.
- The End –
The only thing in this dungeon is goblins and wolves to kill for experience and money. No hidden treasure to find.
Go through and kill all the giants which are mostly the magical ones, then search the east wall of the big open cave room for a secret passage (x51, y47) for more giants to kill. The north wall of the room in the center of the dungeon hides a secret door (x32, y36) to a lock box with 500 gold. And the south wall of the large hallway has a secret passage (x26, y52) to a small room with two giants. Go through the secret door in the north wall to a library with three more giants to kill. The final insult; you know all the spells in the spell books there and you have wasted your time and energy unless you needed experience and money.
There are many monsters to kill in this dungeon to gain experience and money. And there are many weapons in the storeroom for the taking. Of course they are all cursed so you probably don’t want to.
There are lots of demons to kill, but no treasure to reap.
Go all the way to the east then all the way north entering the first room along the north wall. Go through the secret door (x55, y12) and talk to the soul crystal. I believe here there is a bug in the game. If you wait too late in the game there isn’t a way to get them to help you but early in the game if you say ‘fool’ to the crystal soul it lets you in.
This Cavern has Nightstalkers to battle. Make your way north and center to the secret passages at x30, y16; x34, y13; and x38, y10. Pass the Test of Faith (just walk through) and gain the Stone of Life.
Enter and make your way south. Take the next branch on the east to a basalt room, answer the riddle of life, kill the demon, pull the lever behind the secret door to the south to open the gate and go south. Go through the secret passage at x52, y56 and take the stone off the pedestal. Go back the way you came or kill the rest of the occupying monsters for exp. and money.
There are drakes in these caves to battle and many stones to find. They are hidden behind the following secret passages.
X16, y35 – Weak Stone
X42, y22 – Stone of Disease
X42, y41; x36, y42 – Stone of Health
X42, y41; x39, y47; x46, y51 – Stone of Knowledge
X42, y41; x39, y47; x49, y53 – demon to kill
Collect all the stones even those that seem like trouble. You will need them all in a future side quest.
Kill some monsters. Follow the southern hallways to the secret passage at x39, y43. Take stair.
Kill some monsters. Go to the NW corner through secret passage at x9, y5. Take stair.
Kill some monsters. Go to the NW corner through secret passage at x7, y5. Take stair.
Kill some monsters. Go to the NW corner through secret doors at x18, y6; x8, y6; x8, y9; and x12, y9. Take stair.
Follow the hallway, kill the demons, and find the secret door (x17, y21) along the south wall. Go through one more secret door in the SE corner and talk to the Vahnatai there. If you have all six stones from the other dungeons and the items that Mirarn gave you, he will make you a special scepter with them. The scepter will enhance the party in just about every way imaginable including invincibility, but it can only be used a few times. The rune in the north room will take you out of the dungeon.
1X30, 3Y130 – Magical Weapons – Exorbitant
1X40, 3Y126 – Mage Spells level 4 & 5 – Utterly Ridiculous
General Magic Levels – 10,000 gold
2X59, 1Y31 – Steel and Magical Armor – Expensive
3X119, 1Y38 – Priest Spells level 4 & 5 – Somewhat Pricey
4X187, 1Y4 – Magical Items - Exorbitant