from TrueSite
@ the Shadowvale CSR
by Author
by Author
Bodyguards
Holy Ones
Sorcerers
by Glenn
Editor's notes
Introduction
Prologue: The Choice
Bodyguards
Addiction
Part 1: Verena
Part 2: The Avians
Part 3: The Tatterdemalion
Holy Ones
Revenge
Part 1: Secrets
Part 2: War
Part 3: Reasons
Notes in Boulder
Sorcerers
Mystery
Part 1: Unveiling the Myatery
Part 2: Birds of a Feather
Part 3: Well, well. It's the Tatterdemalion.
Locations
by Glenn
Tatterdemalion is a Blades of Exile Scenario by Tarl Roger Kudrick. This is Tarl's second scenario. His first was the generally well-acclaimed "Islands of the Wheel". But THIS one won the 1998 Scenario Design contest and netted me $500. No, you can't have a loan!
WHAT LEVEL OF PARTY IS APPROPRIATE FOR THIS SCENARIO?
This scenario was designed for a party of first-level characters. I know that officially, this is a "high" level scenario. Don't worry. That just means the monsters won't double their hit points until parties get to about 18th level. Your characters will probably not become 18th level, so monsters won't double their hit points, which was my goal all along.
WHAT'S THE GOAL OF THE SCENARIO?
To join one of Triane's three Groups--the Bodyguards, the Holy Ones, or the Sorcerers--and then stop the Tatterdemalion and any other foes of Triane before the valley of Triane is destroyed.
DOES IT MATTER WHETHER I BECOME A BODYGUARD, HOLY ONE, OR SORCERER?
Absolutely! The ENTIRE PLOT hinges on this decision. NPCs who are your friends in one version may be your enemies in a second version, and they may not exist at all in the third version.
Each plotline has at least three unique missions, and several shared missions as well. A lot of the shared missions may LOOK alike, but they really aren't. For instance, just because you've solved the ogre cave as Sorcerers doesn't mean you can apply the same solution if you play as Bodyguards. It won't work. And even some of the outdoor encounters which are the same become uniquely challenging because of the composition of your party when you're with each group.
SO REALLY, "TATTERDEMALION" IS LIKE THREE SCENARIOS IN ONE.
Right. Think of it as a cross between regular Blades of Exile and Diablo, but where the whole plot changes instead of just your own strengths and weaknesses.
ANY OTHER DIFFERENCES I SHOULD KNOW?
The Bodyguard storyline is rated PG-13, the Holy One storyline is PG, and the Sorcerer storyline is, oh, either G or PG.
Also, one of the stories eventually becomes a comedy, another is a straight drama with an upbeat ending, and the other borders on tragedy. But I'm not saying which is which, and I don't think you can guess from the ratings.
To verify that I have found all the details, I have tried to contact the author by the only available means, listed above, then went to available boards in search of him. Sadly, I've been told that he left the BoE environment, long ago. I wish to express here, my most sincere gratitude for a well made scenario that provides a better insight into each of the three working groups of Party Characters, PC's employed in all these scenarios: Bodyguards (Fighters), Holy Ones (Priests) and Sorcerers (Mages).
I'd also like to point out that this scenario, Tatterdemalion, was the winner of the first ever scenario competition. Although other scenarios have been written and other competitions have taken place, I find it appropriate that as the first, this was a scenario that, uniquely, utilizes all three styles of play with three different story lines. Because of this, I, personally, feel that this should be one of the earliest scenarios of anyone's BoE playing experience.
In this scenario you will be required to join one of the three Groups: Bodyguards, (Fighters); Holy Ones, (Priests); or Sorcerers, (Mages). It is recommended that you start with a Party that is balanced for all three styles. It would be counter-productive to make any of the Party Members Frail, or Magically Inept. Rather, having a Good Constitution, or making them Magically Apt would be a benefit for any Group chosen.
During the indoctrination section, you will tour Triane and it's Cities. You will encounter a few low level monsters, so it might be a good idea to acquire some low level weapons and abilities, too.
After an indoctrination section, you will have to make a choice. Depending upon which Group you choose, the story will go one of three directions. Although the Ceremony does shift your skills significantly to the particular character type chosen, it does not restrict you to only those values. As the scenario plays out, you will gain experience which converts to Skill Points, which you then use to increase your Skill Levels. Although, each scenario is written around a particular style of character traits, you do have the choice, as in any other scenario, to make changes in the Skills of each of your Party Members as your Levels increase. However, increased Skills relative to the particular scenario, though not mandatory, are certainly advantageous.
As in most BoE scenarios, it is extremely advantageous to talk to everyone available, both during the Indoctrination and Main sections. You might not find out, until it's too late, that a person, place or thing you encountered in the indoctrination section doesn't exist in the main scenario! This makes the idea of keeping numerous saves important. Again, if you've missed something, or feel you could have done something differently, it's a shorter distance back to make corrections.
Also, I would recommend that once you've joined one of the three Groups, you first visit that appropriate City to acquire those special items, or abilities for that particular Party type, thus, maximizing your abilities immediately.
* Accompanying this walk through is a more detailed list of the locations of the more important areas in all three scenarios.
These three groups were known as the Bodyguards, Holy Ones and Sorcerers.
Two weeks ago you received an urgent plea for help from Triane. After a long, difficult journey, you arrive at your destination.
O-070, 122: As you enter the Grove, you are greeted by Tocaunde, the Grove Tender and Greeter, second in command. He asks if you will accept this Mission. You do, of course and he leads you into the Grove, saying, "This is where the Berries are grown."
She explains that, first, Triane will not survive without your help. The Berries that are grown in the Grove have the ability to enhance natural abilities and philosophies. Because of this, the people have developed into separate Groups, each with their own characteristics. Each Group feels that their philosophies are right which has made them argue between each other. Verena further explains that the three Groups would rather die than be saved by outsiders. However, if you will join any one of the Groups, they have all agreed to accept you as one of them. So, you will have to choose which one of the three Groups.
Also, she explains, Triane has two enemies. One is the Avains, humanoid birds, an ancient foe of the Nephilim. The other is the Tatterdemalion, or �Raggedy Man�. This Monster leaps out of the ground like a fish, grabs people, tears them to shreds, then drags their bodies back into the earth.
She tells you to visit with the three Groups. Be sure to talk to everyone you can. Ask and learn about Triane; it�s people and it�s problems. When you decide which Group you wish to join, return to her and say that you are �ready�.
You will go through a ceremony for the group you decide upon, including the eating of the Berries. Although the change will not be permanent, it will make changes in you that will reflect the abilities of the Group you choose.
There are three roads leaving the Grove, to each of the three Cities where each of the Groups live. They are:
O-139, 179: South East, to Aegre, home of the Sorcerers.
At the entrance to Aegre, be sure to talk to Eugene, the information Bat. He�s one of the items the Author put in the story to inject a bit of �levity�. He may, as scenarios progress, be one of the sources of information for you.
26, 18: You may purchase Level 4 Mage Spells during this �indoctrination� phase from Yunam.
21, 18: Vilonia, the Leader of Aegre, will say to you, �If you become Bodyguards, return and ask me about, �Service� �.
O-011, 180: South West, to Dolomite, home of the Bodyguards,
37, 21 and 40, 20: Dreffle. He is a Nephil Trader and another source of information for you.
27, 37&38:You may purchase standard weapons and armor during this �indoctrination� phase from the Master Crafters.
25, 25: Helfin, the Leader of the Bodyguards, will say to you, �If you become Holy Ones, return and ask me about, �Temple� �.
O-071, 073: North to Opelka, home of the Holy Ones.
12, 10: You may purchase level 4 Priest Spells during this �indoctrination� phase from Milles.
22, 24: Dothar, the Leader of the Holy Ones, will say to you, �If you become Sorcerers, return and ask me about, �Tome� �.
O-070, 122: Oasil�s Hideaway; Mountain Entrance.
Oasil is an outcast from the Trinity, (BG, HO, SO). Groups who don�t let people think for themselves.
Buy, Identify, Heal, Train.
After visiting the three Groups, you return to the Grove and Verena. She asks if you have made a choice. You tell her you have and she sends you to the South West corner of the Grove to a Square of Stones. There you are to enter a hole leading to the Ceremonial Grounds.
-------------------------------------------------------------------------------------------------------------------------------
* NOTE: This is the �Point of no Return�, when you w ill HAVE to make a choice as to which Group you want to join.
-------------------------------------------------------------------------------------------------------------------------------
The first part of the Ceremony is to give the Party a chance to reconsider their choice. The Ceremony takes three days and three nights. You will eat the Berries, then enter a coma. When you awaken, you will have changed.
As Bodyguards, you will be Stronger and Quicker. Your Fighting and Stealth skills will increase and you will lose much, if not all, of your understanding of Magic.
As Holy Ones, you will acquire great Wisdom and Priestly abilities, with slightly less strength. You will retain all your weapon skills and you will access most powerful Priest Spells.
As Sorcerers, you will have great Knowledge, Magical abilities and Alchemical skill. You will become weaker and clumsier and you will access most powerful Wizard Spells.
Verena says to be sure of what you want, then enter the space behind her.
Once in the Ceremonial Chamber, she will ask you, in succession, which group you want to join;
Bodyguards ?
Holy Ones ?
Sorcerers ?
Answer, �Yes�, to the Group you�ve chosen and the scenario carries you through to the point where you awaken.
An opening appears in the East Wall. You are directed to go there to prepare yourselves.
After you have �prepared� for your chosen journey, go South, exiting to the Grove.
ED: Following this �introductory� section, I have written out the three scenarios, again, alphabetically, for clarity, starting with, the Bodyguards, then Holy Ones, finally Sorcerers.
When you awaken, you feel stronger, quicker and healthier than ever!
You have a tangible sense of purpose � you are Bodyguards!
In an adjacent room, to the east are Bronze Weapons and Armor.
You equip the members of the Party, then leave to speak with Verena in the Grove.
Go to Dolomite.
O-011, 180: DOLOMITE: As Bodyguards, upgrade Weapons, Armor, etc.
37, 21 and 40, 21: Dreffle. Identify, Sell, Ask.
* If you didn�t talk to him during the �indoctrination� phase, speak with Dreffle. He will mention Arichat, his attitude and his �inner circle�. He will also tell you to ask him about, �The Pure�.
13, 34 & 21, 34: BODYGUARDS ONLY!
13, 38: Lula: Magic Weapons. The Sorcerer�s enchant the weapons, in return, the Bodyguards kill Null Bugs for them. They haven�t asked for help lately, so we don�t have much in stock.
21, 38: FORDYCE. Master Trainer.
* He tells you, �Arichat would have a fit if he knew I was teaching Magic!�
27, 37&38: Master Crafters.
Sarian: Armor, Shields, Helms.
* He says Arichat is a great Warrior and thinks he would make a better Leader than Helfin, or Reve�.
Tierney: Bows, Arrows.
* He doesn�t like Arichat and thinks he�s �close minded�.
Gonsella: Weapons.
* She thinks well of Arichat and suggests you talk to him.
33, 27&28 and 27, 32: Main Hall.
31, 28 and 29, 30: Arichat. Quartermaster.
* He is adamant about his dislike for any sort of Magic. Ask, �pure�. He asks who told you about that. You answer, �Dreffle�., then he asks if you would be willing to give all Magic Items, including Potions, etc. He tells you to think about it, then return later and ask him, again, about, � The Pure�.
28, 25: Reve�. Second in Command.
25, 25: Helfin. Leader of Dolomite.
*He will tell you that Opelka, home of the Holy Ones, was attacked by an Avian Squad. They attacked houses and farmland and may attack again. Also, there is a problem with Verena. Yesterday, after telling him you had chosen to become Bodyguards, she almost fainted, as in pain. She borrowed his horse and rode away toward Aegre, home of the Sorcerers.
If you can find the cause of the Tatterdemalion, or destroy it, the three Groups may be able to put aside their differences long enough to fight the Avians.
Go to Aegre:
O-139, 179: AEGRE.
23&24, 36: Eugene, the information Bat, says there�s a lot of commotion. Not only is everyone upset that we�ve become Bodyguards, but Verena came here and tried to make Yunam stop casting. The Tatter thing came and killed Yunam, maybe even Verena. It grabbed her, went back underground with her.
14, 37: Cortlind. Cook, Food.
32, 35: Sulligan. Alchemy Ingredients.
28, 25 and 32, 27 and 34, 26: Galene. Potions, Medium Strength.
21, 18: Vilonia, has been drinking and tells you the whole story. She had been working with an altered spell that imprisoned Demons. Yunam had a spell that would attract Magical Monsters. So, together they thought they could trap the Tatterdemalion. When the Tatterdemalion arrived, they had no control, nor power over it. It took Verena and disappeared into the ground.
She goes on to tell you that each of the three Cities in Triane, is over a metropolis of Caves. Verena must be in one of those Caves. She taps each one of you on the forehead, then says, �Now you can see the Caves if you go near them!�
(* Now you can find each of the three Caves near each of the three Cities.)
Vilonia says, �I�m almost sure Verena�s kidnapping is a trap for you! There are two possibilities:
1.) It�s scared of you,
2.) It wanted us to summon outsiders,�
The Sorcerers don�t like Bodyguards and because you�re Bodyguards, the Sorcerers won�t like you, but she says that she can sway their opinions if you do her a favor.
In the Swamps you passed through to get to this valley is a nest of Null Bugs, where they breed. Destroy it and we won�t have a problem between the Bodyguards and the Sorcerers. Again, she touches your foreheads so you can find the easiest path into the Swamps. If you do eliminate the Bugs, come back and ask for your, �reward�. We have some items that you will find very useful!
O-139, 182: Secret Swamp Path to the Null Bugs.
O-167, 215: Building. It disappears! It�s a trap set by Bog Beasts.
08, 07: Bodies with treasures.
O-149, 161: Wil-o-the-Wisp Lair.
25, 11: Wil-o-the-Wisp treasure.
O-149, 117: Breeding Grounds.
24, 07: Hole in the ground to Nest of Queens.
* Return to Vilonia for, �reward�. She gives you a sack of gold and a Necklace, �Haste, (Major Haste), (8)�. She also tells you she has a sister who is a Holy One and her sister has a similar Necklace that will �Bless, (Bless All), (8)�.
O-135, 167: The Mountain Path.
35, 10 leads to: 10, 32: Small opening in Tunnel. Climb. or,
20, 48 leads to: 09, 37: Small opening in Tunnel. Climb.
* Both lead to cave, leading to:
35, 58: Small opening in Tunnel. Climb.
54, 11: Footsteps lead into Cave Wall. * Secret Treasures.
50, 43: In Main Cave fight Hill Dwarf Leader and others.
*Free hostage; EDAREH: Holy One. Third in rank after Dothar and Roselle. During the Avian attack she was ambushed and brought here. She gives you a Necklace. �Bless, (8)�. Also, you will now be welcomed in Opelka.
* Collect treasures, then Exit at: 34, 43.
O-051, 142: Caves near Dolomite.
* As you enter, two exiting Giant Ogres think you are in disguise, and tell you to show it to the King. As a way to get past the Entrance Guard, you decide tell him you have a message for the �King�.
52, 32&33: Secret Passage to sign saying stay away, secret place. Two chests; one with sacks, other with raw Berries.
35, 55: Entrance to �Treasures�: Gold, Star (can be hung), Bell (can be rung), Trophy and Chalk. Leaving you are grabbed by a Giant Ogre and asked if you were in there and took Treasures. �No� will cause a fight. �Yes� will confuse him.
* Walking in, you pick up a piece of the Root. You taste it and find it very acetic. Later, if you ask Tocaunde about it, he will tell you that it�s what gives the Tatterdemalion it�s incredible Power.
08, 34: Pillar. It seems to be the central support of the Cave network. There is much graffiti on it. You could write on it, too.
09, 15: Shore of a large body of water. A Giant Ogre says, �Quiet, you�ll scare the fish!�
19, 15: Ornate Wooden Stand.
* Place trophy on stand and Giant Ogre says to get away. Everything there belongs to him. He asks what is written on trophy. You tell him, �Worlds most valuable Imbecile�. He decides that, since he�s valuable, he belongs in the Treasure Pit.
17, 19: Deep Pit with Giant�s Treasures.
* Now, since you gave him the Trophy, he wants to give you something back. There are old shoes and a Bone Tube in the Pit. So, you ask, �tube�. He throws you a �shoe�. When you ask, �shoe�. He throws you the �tube�.
* Inside the Tube is a map made by someone surveying the area years ago. It describes the Caves and the area outside, including a huge Boulder above the entrance and how it could fall and trap anyone inside. They abandoned any ideas to populate the area as it was too dangerous.
45, 20: Secret Passage:
* You see an immense Cavern with 200 Giant Ogres in formation and one large Giant Ogre training them. (*This must be the King.) Just then the ground opens up and a large male, skin and bones, dressed in rags, appears: It�s the Tatterdemalion! It walks up to talk to the King who nervously says that in two hours they�ll be ready to attack the Grove. Then the Tatterdemalion turns away and sinks into the ground.
(* You must accomplish this part of the scenario for the scenario to continue properly. You need to know that there is a Giant Ogre Army and that you need to cause it�s demise!)
* Having learned of the Giant Ogre Army, you scurry out of the Cave with the Giant Ogres just behind you. As you�re leaving, you remember the Boulder described on the map. You dislodge it and it falls, along wi th part of the mountain, killing all the Giant Ogres and covering the entrance to the Cave. The Army of Super Ogres has been destroyed!
* You return to tell Tocaunde you�ve destroyed the Giant Ogre Army and ask about the piece of root you found. He tells you the �Root� you tasted is the very end of the root from the Berry Bushes. The Tatterdemalion eats these and that must be the reason for its incredible Power.
O-061, 089: Caves near Opelka.
Map of Outcastle
30, 56: Secret passage.
29, 51: Obelisk with a sign, Welcome to �Outcastle�, Defenders of Triane. Now, go home!
31, 52: Tunnel up to secret passage through floor. Enter room with Outcasts, mad from Berries; Fight.
13&14, 35 and 20, 29&30: Both ends of room lead to Halls.
14&15, 32: Barracks
14&15, 23: Hall
15&16, 20: Temple and Prayer Rooms.
15, 16: Pillar with inscription, � In memory of Opelka, the first and true Holy One.�
11, 13: Prayer Room. Chair with �Ruby colored Key�.
25&26, 20 and 33&34, 20: Melee Training Room.
29, 12: Statue with plaque, � We remember Dolomite, the first and true Bodyguard.�
24, 13: Painting with �Gold colored Key�.
39, 14&15: Wizardry Room.
44, 16: Pillar with plaque, �In memory of Aegre, the first and true Sorcerer.�
42, 11: Book Shelf, Tome about �Outcasts�, thrown out of their Cities for reacting badly to the Berries.
46, 11: Tome describing some of the Castle construction.
44, 19: Potted Plant with �Sapphire colored Key�.
52, 25: Dining Room. Hole in the floor where something large was ripped out.
25, 41: Secret passage to six Potions.
53, 20: Door with three Locks: Ruby, Sapphire, Gold. (three keys)
* Open door, four chests with treasures!
52, 11: Loose Stones in Floor. Climb down, passage south.
54, 54: Find Verena, chained and bleeding to death. She says she needs to tell you some things before she dies. �It�s about my Harvesting Plan. The Tatterdemalion thinks we�re going to destroy the source of the Berries. He�s wrong. I�ve found a way to end the side effects. The Groups suspect each other. Find the Statue he stole and you�ll understand. He stole it from Outcastle. There is History here. That Being is a Parasite. It absorbed the first three, Dolomite, Opelka, Aegre. The First �. He did not die�. He changed the most!�. You must kill the Tatterdemalion! You can leave through a passage behind me. But, be sure to read the plaques on all the Statues first!
55, 54: Secret passage out to O-061, 089. The Caves near Opelka.
You tell Tocaunde about the Outcasts, Verena�s death, etc. He says you should visit all three Groups. Someone must know something about where the Avians are coming from. �I believe their home is in the Dessert, to the north west of the Grove. You must carry the battle back to the Avian Base.� Just then, Tocaunde realizes something! (He knows who the Tatterdemalion is!)
O-011, 180: Dolomite.
13, 38: Lula. You can now upgrade to all Magic Weapons, Armor, etc.
27, 37: Master Crafters:
* Gonsella knows that some of the Avians are Spell Casters.
* Coray saw one of the Avians fly off with half of a large, square rock tablet.
31, 28: Arichat gives you the half of the rock tablet that broke off.
O-139, 179: Aegre.
21, 18: Vilonia thinks the Avians are afraid of us, the Adventurers. They only seem to attack when we�re not around. She summoned some birds to scout around. The Avians are in an old Castle, to the north west, in the Desert. She gives you a Magic Dagger, effective against Reptiles. (Birds and Reptiles are similar.)
O-071, 073: Opelka.
22, 24: Dothar says the Avians have no fear of the Triane peoples, but they are all cowards. He says that Unbelievers, (us, the Party), will deliver a message to the Avians. We tell him we will if we can find a way through the mountains. With that Dothar places both hands on the Altar, his eyes seem to burn, he sweats profusely and the whole City shakes. He is now glowing with a strange blue energy. There is a Thunderclap in the distance, to the South of Triane. Now there is a path through the mountains.
O-023, 167: Path to the Desert.
O-009, 050: Abandoned house in the Desert.
* Inside, there are five statues of Bodyguard Warriors. None had ever used Magic Weapons, nor Devices.
20, 11: Statue with loose plaque. Papers with writing about a meeting that took place here a year ago, in Arichat�s writing!
* Outside, Basilisks. Kill to leave, or
24, 17: Weak Wall. �Move Mountains� to escape Basilisks.
O-012, 129: Hole in Ground leads to a tunnel deep underground, to a Cave of a Snake Cult!
* Several Cult Priests, Acolytes, then two Nagas. Find two treasure chests.
O-035, 109: Centaurs battling Avians. Help them? Of course! Defeat the Avians who flee when second leader is killed.
O-023, 083: Sun Priestess. Healer.
O-006, 056: Scorpions and Mutant Spiders. Kill.
38, 12: Body of dead Avian with other half of the rock tablet.
O-041, 055: See a large Squad of Avians flying. You see them change direction, straight for you. You prepare for Battle, but, no! They�re landing two hundred feet behind you. They�re attacking the TATTERDEMALION! There are so many of them! As many die, the Tatterdemalion begins shrinking!! Eventually the wounded Tatterdemalion sinks into the earth. The Avians dress their wounds, then fly off.
* You wonder why the Tatterdemalion weakened so much. At first it was immune to the Avians, but it seemed to lose power and become vulnerable. Why??
O-060, 017: Oasil�s Hideaway; Desert Entrance.
O-012, 009: Avian Fortress. * All the windows are high. Avians, who can fly, have no need for conventional windows.
12, 07: Low, accessible window. Climb. Fight four �Guard Dogs�.
12, 14: Secret passage to N/S Corridor, West.
(*ED: For specific locations in the Avian Castle, see the list of �Locations� included at the end of this Walk Through.)
Map of Avian Castle
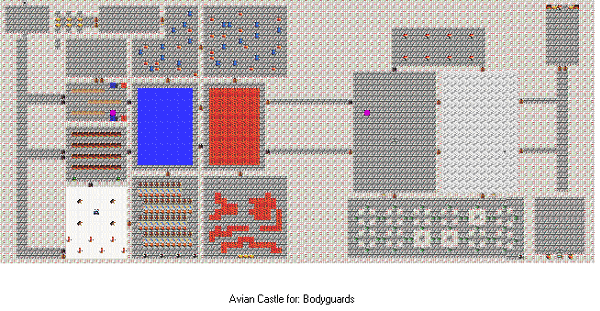
Small Barracks � Big Barracks.
Treasury Room, (Foyer is Trapped! See list of �Locations� included at the end of this Walk Through.)
Room with Lake � Room with Lava � Room with Wind � Room with Earth Floor.
Dining Hall � Firebird�s Sauna � South Prisons.
Room with Firebirds having Feast.
*N/S Corridor, East of the four �Elemental� Rooms.
49&50, 20: Avian Lord�s Room. Battle. Treasure Chests.
(Every Avian with a Staff of Electricity has been wearing a Diamond Necklace! Does that mean something?)
49, 09: Brazier with Foot Lever. �Look� (* This will cause doors to Throne Room to appear.)
49&50, 43: Throne Room. Two thrones with two large Avians, perhaps Vultures?
* Major Battle. (Vilonia�s Dagger is useful here!)
* When one of the two Royalty is killed, the other will fly off with some of the remaining Avians. (Cowards!)
49, 54: After the battle, look at and talk to the Wizard in the Painting. He was the Creator of the Castle. He�ll allow you to leave if you can tell him what his special field of study was. �ELEMENTS�. (The four rooms: water, fire, air, earth.)
You appear outside the Castle. Return to the Grove.
He says, �It came again and took Verena�s Plans.� The Berries are not what causes the side effect. It�s the Sentience whose essence is intermingled with the Berries. Verena�s plan was to kill this Sentience. It feared we would realize it was influencing those who ate the Berries. So, it took a form in case one ever became necessary. You understand that the Tatterdemalion is that form.
This Valley was originally discovered by four Wanderers: Dolomite, a Warrior; Aegre, a Sorcerer; Opelka, a Priest; and a Nephil, named Pejiro, an Alchemist. He discovered how to make the Berries into a source of strong will and nutrition.
The three Humans didn�t just, die. They were absorbed by the Sentience. It used it�s power to make all who ate the Berries just like the Original Three.
Do you know what that means? Like Pejiro, before us, we Nephil have been tending this Grove, thinking we were doing something good, but we were just turning the Humans into FOOD!
Finally, you ask, what ever happened to Pejiro? Tocaunde says, �History tells us he just died. But now we know what happened � Verena discovered that, too. Pejiro ate the Roots, thinking he could become stronger. Pejiro was converted into the Tatterdemalion. There is no way to reverse this. Verena was right � You must kill the Tatterdemalion.�
Tocaunde points to the statue behind him � the one the Tatterdemalion stole from Outcastle. The plaque reads, �We must remember Pejiro, the first and true Grove Keeper.� The Tatterdemalion came here to give it to me to dishearten me � it worked. I cannot harm a Grove Keeper.�
Verena�s Harvesting Plan contained a Map of Tunnels leading to the Tatterdemalion. I have found the opening to one North of the Grove.
Find the Tatterdemalion and Destroy it. Tocaunde is going to the three Cities to tell them what he has learned.
O-072, 126: Pit.
Climb down into the Hole. You see numerous orange pools of energy throughout twisting, confusing tunnels and a light toward the south exit.
* Stepping on an energy pool causes tremors in the tunnels.
(The fourth time you do, debris will fall on you, causing damage. The fifth time, the tunnels will collapse, killing you!)
(Note: These are different scenarios that have different solutions to the Maze in each scenario.)
* Bodyguard Solution: From the entrance, South (2) to the first intersection, facing an energy field, then:
West (4), one field crossed. South (9), one field crossed. East (4), no fields crossed.
South (12), two fields crossed. From this intersection, take two steps south to the Exit.
You will have exited into another Tunnel. It leads south to a large Cave where the Tatterdemalion is in the center, surrounded by eight large trees.
* These trees are the base of the root system of the Berries and the Ultimate Source of the Power.
* The Trees, (Roots), are the source of Power, so you must defeat, kill, these trees, destroying the SOURCE of power, while the Tatterdemalion is attacking your party.
(The Tatterdemalion can�t be defeated! �Kill� the trees!)
* With the destruction of the trees, the Tatterdemalion disintegrates and dies. All that remains is a pile of sticks and the badly decomposed corpse of Pejiro.
* You immediately are drawn upward through the earth to the Grove where Tocaunde and the Leaders of the three Groups express their gratitude. The scenario plays out to the end..
END
When you awaken you feel a powerful, divine essence all around you.
You have a tangible sense of purpose � you are Holy Ones!
In an adjacent room, to the east, there are twelve Skill Potions and a Minion of Verena. The Minion explains that you should share the Potions, drink them, then he will �train� you. He also warns that you should, specifically, use this training to increase your Spell Points. Upon completion, you leave to speak with Verena in the Grove.
When you return to the Grove, you notice that very few of the Nephil are working. Instead, there are humans from all the Cities doing the harvesting. Verena explains that the Nephil are �on strike�. The Avians struck the Grove again and the Nephil are terrified of the Avian menace. Also, the Tatterdemalion struck again, twice! It took one Holy One and one Sorcerer this time. Verena and the other Nephil most fear the Avians, while the humans fear the Tatterdemalion most.
Because it lives underground, she feels that it must have a Lair in one of the Mountain Caves near each of Triane�s Cities. You should visit each of the Cities and speak with everyone you can. Someone must know of the locations of these Caves.
Oh, and by the way, Tocaunde wants to speak with you, too.
You meet with Tocaunde who says that he noticed a large Boulder in the north west corner of the Grove that was not there before. Yesterday, while working in the area, he saw it move! An inhuman hand came out of the ground and placed a parchment note in a crack in the Boulder. He read it and was alarmed. He left the note for whom it was intended, but tells you that you should read it, too. However, once you�ve read it, do not tell anyone else about it, including Verena, until we�re certain who placed the note there. Wrong accusations could start a Civil War in Triane.
The note says, �I thought I told you not to do anything loud! Do you call murdering Sulligan, quiet? Well you just wait to see what I�m going to do! I can�t wait to read your reply!�
You place the note back in the rock and remind yourself to check back once in a while to see what the next note says.
(* A total of three messages will be found. Check after each Cave adventure!)
32, 31: HOLY ONES ONLY!
WOODLE: Priest Spells, Level 5 & 6.
* Ask �Outcasts�, he explains who they are and shows you a map of their Cave �Location�.
35, 39: DEYLAN: New Armorer, now that CONWAY is gone.
* Tells you that �Outcasts� live in a nearby Cave.
O- 011, 180: Dolomite: Home of the Bodyguards, (Fighters).
37, 21 and 40: DREFFLE: Says you should ask Reve� about �Monster�.
37, 27&28: Main Hall
28, 25: REVE�:
* Says the Tatterdemalion looks much like the Giant Ogres. She shows you a map of the location of their Cave.
25, 25: HELFIN:
* �Mission�, Shows location of a Passage, south of Dolomite, to Caves of Undead. Wants you to permanently end their threat. Return and prove it, he�ll reward you with Magic Weapons and Armor.
O- 051, 142: Giant Ogre Caves.
* As you enter, two Giant Ogres pass you by. They think you�re in disguise and say you should go show this to the King. This gives you an idea to get past the Guard at the Entrance. Telling him you have a message for the King, he allows you entry.
52, 33: Secret passage to two boxes; one with six empty sacks and the other full of raw Berries.
35, 55: Secret passage to Sack with: Gold, Bell (can be rung), Star (can be hung), Trophy, Chalk.
* Leaving the room, a Giant asks if you were just in there. �No� will cause fight, �Yes� confuses him.
45, 20: Secret passage to a ledge overlooking many Giant troops with King inciting them to attack the Grove.
17, 19: Treasure Pit: Guard explains that if something has a star on it, they consider it valuable, so they throw it in the Pit.
08, 34: Pillar: This seems to be the main support for the Cave ceiling. It has much graffiti on it. The scenario asks if you�d like to draw something on it? You draw a star on it, as described by the Pit Guard. The Giant Ogres see the star and think the Column is valuable, so they start tugging on it to take it to the Pit. You just make it out of the Caves as half the mountain falls in, killing them all.
O- 013, 183: Secret Swamp Path to the Undead.
O- 012, 203: Wil-o-the-Wisp�s Lair:
25, 11: Wisp�s Treasure.
O- 072, 211: Illusionary �Castle�. Bog Beast�s trap!
07, 08: Bog Beast�s treasure.
O-106, 206: Temple in the Swamp.
* Kill many Undead and three �Roots of all Evil�, causes opening in West wall.
18, 17: Opening to two more �Roots of all Evil�.
* Although Undead will exist for a while yet, this deletes their source of power in this area.
05, 09: Opening appears in West wall to exit the area.
Return to Helfin who rewards you with: Magic Broadsword, Flail, Mace and Breast Plate, Chain Mail, Studded Armor.
O-139, 179: Aegre: Home of the Sorcerers, (Mages).
32, 35: Nell: New Alchemist, now that Sulligan is gone. Alchemy Ingredients.
28, 25 and 32, 27 and 34, 26: Galene. Potions.
14, 37: Cortlind: Food.
* Tells you Troglodytes were responsible for his death, possibly the Monster. Shows you location of their Cave.
O-132, 188: Secret Cave of the Troglodytes.
This is an underground extension of Lake Aegre, with numerous small islands where the Troglodytes have set up farms to live. They warn you to stay away, saying, �Go away, or we�ll bring the Monster back!�
* A boat is at the entrance, allowing you to access the islands as you fight your way through the area.
32, 28: Middle Island, there is a lever. Pulling it, you hear a grinding noise to the south.
29, 46: On the south landing, an opening at -27&28, 47- has appeared in the wall that was caused by the lever.
* As you enter four Troglodytes and their Leader ask if you are responsible for the slaughter of their people. If �yes�, then they fight. If �no�, then the King explains how the Tatterdemalion appeared in one of the Troglodyte warrens to the surprise of the inhabitants and itself. It spoke to itself in two voices, one Male and one Female. The Female voice said, �This might be a good test.� The Male voice replied, �I agree.� It proceeded to slaughter all the Troglodytes then walked away, right through the stone wall. Satisfied you had nothing to do with it, he says you may leave with no more fighting.
O- 079, 077: Outcasts� Cave:
Map of Outcastle
31, 52: Tunnel slopes up to Magical Door in Ceiling, (floor). Enter room with Outcasts, mad from Berries. Fight.
13&14, 35 and 20, 29&30: Both ends of room lead to hallways.
14&15, 32: Barracks
14&15, 23: Hall
15&16, 20: Temple & Prayer Rooms. Kill all.
11, 17: Prayer Room with chair. �look�. �Ruby Key�.
25&26, 20 and 33&34, 20: Melee Room.
35, 17: Loose Painting, Hole in wall. �Gold Key�.
39, 14&15 and 50, 14&15: Wizardry Room.
42, 11: Book about �Outcasts� thrown out of Trinity because they reacted badly to the Berries. 46, 11: Book about the south east portion of the castle was not completed as it wasn�t needed.
48, 19: Potted Plant. Lump in dirt is �Sapphire Key�.
23, 27&28 and 28&29, 23 and 37, 27&28 and 32&33, 33: Big Barracks.
30, 40: Secret passage to Potions; 2 strong heal and 4 ????
51, 22: Door with three locks; Ruby, Gold, Sapphire.
* Treasure Chests.
52, 11: Trap Door in floor. �Climb�.
55, 54: Secret passage back outside to Cave entrance.
Return to Grove. Verena, Nephil, Bodyguards, Holy Ones and Sorcerers are all fleeing the Grove. The Tatterdemalion is attacking it! �Dolomite!�, Verena shouts. �Flee the Grove. We�ll meet you there.�
As you enter Dolomite, Guards take you to the Guards Barracks, now being uses as an emergency meeting room. Members of all factions are arguing, as usual. Verena speaks up and says they should ask us.
Arachat has found the parchment notes and asks us, �You knew about this all along. Did you tell anyone in Triane these messages were here?� You say, �No.� They respond that you�ve been hiding information, a major argument erupts, then they all start fighting violently. Verena says to meet her in Opelka as all Hell breaks loose and Civil War erupts in Triane.
Go to Opelka. It is quiet, but with a mix of Gloom and Frustration.
Verena is with Dothar at his Altar. She says, �We have a �mission� for you. Not only has the Tatterdemalion taken over the Grove, but now the Avians are involved. There is an Avian population in the desert, north and west of Triane. We don�t get along, but they haven�t bothered us until recently. The Tatterdemalion invaded their Base and killed over 100 Avians apparently, for no reason. When the Avians found out the Tatterdemalion was centered around Triane, they attacked the Grove. I had convinced them the Nephil weren�t involved, but they�ve found out that two humans in Triane are connected to the Monster.
An Avian showed up a week ago and delivered a Scroll saying the Avians have declared War on Triane. They�ve built up an Army of over 5,000 Avians and will attack by the end of the week unless Triane surrenders first. They think the Tatterdemalion is sanctioned by all of Triane. You must go to their Base and convince them they are wrong. Dothar will show you how to get to their Base. Take these � She hands you some of the messages from the Bounder, enough to show that only two people are secretly controlling the Monster. Take them to the Avians. Get them to sign a Truce, at least until we find out who�s behind all this. Dothar will show you the way to the Avian Base.
Dothar touches you and you see a Fissure in the Mountains, just north of Dolomite. Avians live in the Desert on the other side.
O-023, 167: Fissure in the Mountains to the Desert.
O-009, 150: Abandoned House in Desert.
Enter. See five statues of Bodyguard Warriors. None had ever used Magic Weapons, nor Devices. On the north statue, the plaque is loose. You examine it and find papers describing a meeting held here long ago in Arachat�s hand writing!
* Outside, you hear digging and lizard-like noises. Basilisks!
24, 17: �Soft� Wall. �Move Mountains� to exit west and escape Basilisks.
O-012, 129: Hole in Ground. Enter. Find Snake Cult. Kill two Nagas and others, find two boxes with treasures.
O-035, 109: Centaurs fighting Avians.
O-023, 083: Sun Priestess: Heal.
O-006, 056: Scorpions and Mutant Spiders.
38, 12: Dead Avian with half a square stone tablet.
O-041, 055: Dead Avian. Find Glowing Yellow Sphere.
O- 060, 017: Oasil�s Hideaway, Desert entrance.
O-011-013, 009: Avian Fortress.
56, 34: Small Hole in Magical Field. Use Glowing Yellow Sphere to neutralize field, but the field senses that you are different, so it teleports you to a room in the north west corner of the Fortress, where there are four �Guard Dogs?�.
12, 14: Secret passage to N/S Corridor, West.
(*ED: For specific locations in the Avian included at the end of this Walk Through.)Castle, see the list of �Locations�
Map of Avian Castle
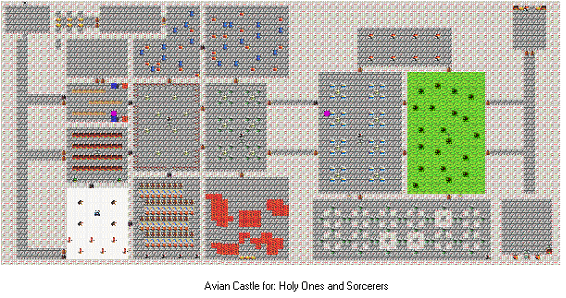
Weapon Smith room � Library � Sorcery Room,
Small Barracks � Big Barracks,
Treasury Room, (Foyer is Trapped! See list of �Locations� included at the end of this Walk Through.)
Rooms with Statues of Bodyguards, Sorcerers & Holy Ones � Room like the Grove,
Dining Hall � Firebird�s Sauna � South Prisons.
Room with Firebirds having Feast.
* Northern E/W corridor.
* Weapon Smith room.
25&26, 24: Locked doors.
31, 26:East doors lead to Room with Statues of Triane�s Bodyguards!
38, 30: Glowing Book on Pedestal. �Look� It�s a �Scrying Device!�
You see Bodyguards being trained. Not very informative.
* Room with Statues of Triane�s Sorcerers!
51, 33: Glowing Book on Pedestal. �Look� It�s a nother �Scrying Device!�
* It�s set on a scene of Galene, Aegre�s Alchemist, talking to a Holy One.
You can�t see who it is because they�re wearing a Hooded Cloak.
* Room with Statues of Triane�s Holy Ones!
19, 33: Glowing Book on Pedestal. �Look� It�s another �Scrying Device!�
* It�s set on a scene of Dothar yelling at Ledland for not doing his job.
You notice Ledland is holding a very old, very thin book behind his back.
* Room laid out like the Grove in Triane.
There is no Glowing Book in this Room.
19, 43: South East Prisons.
* Stand on Rune to open Cell: Major Battle. Basilisk, Ruby Skeleton, Demon Golem, (Gold Ring of Protection.)
49&50, 17: Avian Lord�s Room.
48, 09: Chest with Diamond Necklaces. (You note that all the Avian Spell Casters wear these Necklaces!)
49, 09: Brazier with lever at it�s base. �Look� It makes Doors to Throne Room appear.)
49& 50, 43: Throne Room. (Two large, vulture-like Avians on the two thrones.
* Although several of the Avians seem to be afraid of you, The two �Leaders� seem to be a sense of �strength�.
(* Concentrate on one Leader!)
* Scenario takes over: With one of the Leaders at the brink of death, Party yells, �Stop!� We show them the notes from the Boulder, they read them and ask if we�ve found out who these people are and have we stopped them yet? We answer, �No, but with what we�ve learned, we�re going back to Triane to straighten this out, for once and all.� The Leaders ask us to heal their wounded as a gesture of good faith, which we do. The Avians will keep the notes for their records, then fly away. Before they go, they say you will have to use the �Emergency Exit�. Talk to the Painting on the south wall. Say, �Good Bye.�
49, 54: Painting. �Look�. Scenario takes over conversation and you are teleported outside the Avian Castle.
O-071, 128: Hole in ground, entrance to the Catacombs.
Climb down into the Catacombs. You see numerous orange pools of energy throughout twisting, confusing tunnels and a light toward the south exit.
* Stepping on an energy pool causes tremors in the tunnels.
(The fourth time you do, debris will fall on you, causing minor damage. The fifth time, the tunnels will collapse, killing you!)
(Note: These are different scenarios and have different solutions to the Maze in each scenario.)
Holy Ones Solution: * There are two possible routes. In one you step on four energy pools, taking minor damage on the last energy pool. In the other, you step on three energy pools, taking no damage.
(Note: Pools at intersections can be passed diagonally.)
From the entrance, South (2), to the first Intersection: East (3), South (2), Southeast (1) stepping on pool #1, South (1), Southwest (1), West (2), Southwest, diagonally (1), South (1), Southwest, diagonally (1), West (1), Southwest (1), South (2), Southeast (1), East (2), South (5), stepping on pool #2.
At this point, (Intersection), you will be facing another energy pool. You may choose the shorter route, stepping on two more energy pools and take minor damage, (~10 � 15 HP), or the longer way around stepping on only one pool, taking no damage.
If you choose to take the shorter, quicker route, continue South (6), stepping on two more energy pools, through the South Intersection, exiting this maze.
If you choose to take a longer route, turn West (2), Northwest (1), West (1), Northwest, diagonally (1) North (1), Northwest (1), North (2), West (3), South (2), Southwest (1), West (2), South (3), East (5), Southeast, diagonally (1), South (3), East (6), stepping on Pool #3, arriving at the last Intersection. Head South to exit the maze.
You have successfully led everyone through the Dreadful Catacombs, but you made so much noise there�s no chance of surprising anyone. You all step into a large Cavern where Ledland and Galena are waiting for you with the Tatterdemalion.
* Scenario: The Party discovered a diary kept by Malcette, who created the Tatterdemalion years ago. Malcette had both Mage and Priest skills. This prevented her from belonging to any one of the Triane�s Groups, so was rejected by them all. She created the Group known as the �Outcasts�. She had created the concept of the Tatterdemalion, but didn�t live long enough to actually make one, but left the instructions in her Diary. Since the Ritual required both Mage and Priest skills, it would have to be performed by both a Sorcerer and a Holy One. The scenario goes on to tell the rest of the story.
Galene, who was a Sorcerer, always wanted to be a Holy One. Ledland, who was a Holy One, always wanted to be a Sorcerer. So, they formed a pact and created the Tatterdemalion. Now, the big Battle. Ledlund �sics� the Tatterdemalion on us.
( You can�t defeat the Tatterdemalion, so you must kill Galene and Ledland!)
When both Galene and Ledlund are killed, the Tatterdemalion ceases to be under anyone�s control, so it becomes still. Everyone congratulates and thanks each other. But, then the Tatterdemalion speaks. �These actions were not mine. Who created me only to use me in such a way? How can I be certain no one can control me again?� Yo u tell it about the Book. It says, �Destroy the Book, or I will return.� It then sinks into the ground.
The scenario does it�s closing with the people still arguing about the Berries, etc. You have saved Triane from Mutant Ogres, Avians and the Tatterdemalion, but you can�t save Triane from it�s own disagreements. The people living here will have to do that themselves.
END
First.) I thought I told you not to do anything too loud! Do you call murdering Sulligan, quiet? Well, you just wait to see what I�m going to do! I can�t wait to read your reply.
Second.) Very sorry to take so long responding. Hold off on next move for a while. Verena�s outsiders joined the Holy Ones and have wasted no time causing Trouble. They�re asking far too many questions. We must lay low. That�s why I waited until now to place a message here. I put it here when they were off exploring caves. It was the only time I felt sure they wouldn�t be in the Grove. I suggest you do the same. As for Sulligan - you murder Conray, and you tell me to stay quiet? You know I hadn�t read your last message when you killed him. You Moron! I only killed Sulligan because he suspected me. He had to die. What�s your excuse for Conray? This is exactly the sort of thing that�s going to get us caught! We must lay low for a while! Don�t you dare use the �T� again! Not yet!
Third.) I got your previous message here. Waiting until Verena�s Group is busy exploring Caves is a great idea. They finally went off on another expedition, so I have put this message here. I don�t know why you killed Sulligan, because he suspected you. I won�t say why Conray had to die, but he did. And are you really afraid of Verena�s Group, or is there another reason you want me to wait before using our pet monster again? Remember you can�t use it again until I do. So, if I wait, you wait longer. I don�t think Verena�s so-called Holy Ones are anything t worry about. They don�t know anything. They�ve talked to me and probably you, too and they�re still dumb as eating a raw Berry. I will act again, soon, whether you like it or not.
When you wake up. You feel the ebb and flow of Magical Forces all around you.
You have a tangible sense of purpose � you are Sorcerers!
In an adjacent room, to the east, there are twelve Skill Potions and a Minion of Verena. The Minion explains that you should share the Potions, drink them, then he will �train� you. He also warns that you should, specifically, use this training to increase your Spell Points. Upon completion, you leave to speak with Verena in the Grove.
�You must go to each of the three Cities.� She says. �See what damage they�ve suffered and do what you can to help. But, ultimately, you must stop the Avian menace. We cannot allow the Grove to be destroyed.�
�The Tatterdemalion lives underground. There are Caves near each of the three Cities. Someone in each City must know where. Explore all three. One is probably the Monster�s Lair. If you learn, or accomplish anything important, come back and tell me.�
O-139, 179: Aegre.
23&24, 36: Eugene.
* Ask, �Vilonia�, he says he saw the Tatterdemalion take Vilonia, then go into a Cave west of Aegre.
* Ask, �Cave�, he taps you on the forehead, now you can see the Cave location.
26, 18: Yunam. Mage Spells, Level 4.
* The Tatterdemalion has taken 10 people: 5 from Aegre, 3 from Opelka, 2 from Dolomite.
* Find Vilonia, dead or alive. Come back when you know something.
09&10, 21 and 36&37, 21: Sorcerers only!
23, 06: CIBEK. Mage Spells, Level 5 & 6.
* All of our spells were useless against the Creature. It seems unaffected by Magic.
32, 35: Sulligan. Alchemy Ingredients.
28, 25 and 32, 27 and 34, 26: Galene. Potions.
* Although the Tatterdemalion has taken people, we�ve never found any of the bodies.
O-011, 180: Dolomite.
37, 21 and 40, 21: Dreffle.
* The Tatterdemalion took Lula. He, too, agrees that no one has seen any of the bodies that were taken.
25, 25: Helfin.
* He noticed the Tatterdemalion left a magical trail west of the Building for, �Bodyguards Only�.
07, 38: Path of magically affected ground � trail of the Tatterdemalion. An image of a Cave comes into your mind.
O-071, 073: Opelka.
22, 28: Roselle.
* The Tatterdemalion seems to be picking off high ranking Members of each of the Communities.
* Needs your �help�. �Mission�. East of Triane, in the Swamps, there is a hidden Path. She touches your heads � now you will be able to see it. Somewhere in those Swamps is a Tower that belonged to an Arch-Mage, now long dead. He stole a priceless Volume of Olpekan History. The Book contains Prayer Rituals which may be used in combating Triane�s current enemies. The Tower is protected by magical traps. Get the Book, return it to me and I will reward you with it�s Prayer Ritual. Tell me you have the �Tome� and ask me, �reward�.
15, 37: Ledland.
* He knows of the �Outcasts� in the Mountains and is telling you about them, then realizes the Tatterdemalion took Dothar west, into those Mountains, toward their Caves. He shows you, on a map, the location of their Caves.
O-080, 085: Path to the Swamps to the Arch-Mage�s Tower.
O-185, 007: Arch-Mage�s Tower. Long Staircase up.
14, 31: Door, hovering in space. �Climb�.
* You are in a Room, converted to grow mushrooms. To the east, there is a locked Portcullis.
04, 07: Obelisk with sign, �Vault #1�. A ghostly voice says, �Get twenty.�
* Solution: Twenty �mushrooms�, (4-4-4-3-5), so you just have to be at the portcullis when you get them.
* Go through the Portcullis to a box with: Gold, Sorcerer�s Blade, Diamond Necklace.
* Adjacent to the box is a �special� indicating the floor is an illusionary and will take you back to the staircase.
21, 24: Door, hovering in space. �Climb�.
* You are in a Corridor at 04, 14. At 07, 14 �Quickfire� starts behind you. (Go to �Combat� Mode.) At 14, 14 is a Robe, (Robe of the Arch-Mage � in �Combat� you don�t have to be adjacent to retrieve it, just near.).
Four spaces before the end of the Corridor, at 13, 14 is a hidden exit, south. It teleports you to a series of hidden doors, leading west. At 04, 17 you will be teleported back to the staircase.
32, 13: Door, hovering in space. �Climb�.
* You are in a Room with: Locked Portcullis, Lever, Contraption with images. (Slot Machine: Need three Runes.)
* Pull lever. Until you hit three Runes. You will get �chance� results. When Portcullis opens, access Chest with: Runeshield, Ring of Skill, Ring of Skill. Adjacent to the Chest is an illusionary floor back to the Staircase.
* As you reach 39, 07 on the Staircase, you are yanked into a Room. A voice says, �So, you thought you could steal my treasures and get away with it? You will have to be punished for this� (Fight/Kill 2 Skeleton Priests, 4 Wraiths.)
* Searching the Bookcase, at 42, 36 the last, (east), book is a trigger to a teleport trap taking you to the adjacent room. There, you have to Fight/Kill the Arch-Mage, who is a Lich, and 4 Imps.
37, 31: Pedestal with the Book Roselle wanted!
40, 37: Pedestal that teleports you back to the bottom of the Staircase.
O-118, 066: Wil-o-the-Wisp�s Lair.
25, 11: Wil-o-the-Wisp�s Treasure
O-167, 072: Swamp City, (Bog Beast�s Trap!)
08, 07: Bog Beasts� Treasure.
Return to Opelka and give the Book to Roselle. She recites a Ritual from the Book, creating a ring, �Major Heal-All (5)�. The ring will regenerate itself every month. Roselle also says that there may be other important items in this book. She needs to study it.
O-126, 173: Cave west of Aegre.
* As you enter the cave you hear, �Melvin, is that you?�
45, 19: The voice says, �Ready, or not. Here I come!� The cave wall opens and you see a Dragon.
KAREFHI tells you about �Melvin the magnificent, Mage of Mingor, probably long dead. He used to trap unusual Creatures. �But you are not Melvin, nor was that other Being.� It starts to tell you about the Tatterdemalion, just then, a high pitched squeal comes from deeper within the cave. Karefhi asks, �Will you do me a favor? Find what that squeaking noise is and do something about it! I�ll tell you about the Monster, but be careful!�
13, 36: Sign, �All who are not Melvin, are not welcome!�
16, 39: Secret door to empty room.
24, 41: Door. As you enter, a high pitched voice says, �Oh no! Don�t come in that way. Come in the other way!� You�re teleported to a room full of Spiders.
24, 49: Door to room with four Wind Spirits.
32, 49: Door to room of damages.
20, 45: Secret Door. Voice says, �Oh, goody! You found me. Come on up.�
20, 17: Entrance to Tunnel. Talking Spider, WINKY. �I�ve been making a home for myself. I like it here, but I can�t leave. There�s a big Monster out there. It�s got four legs and scales and it sneezes. I�ve been trapped in here for weeks. Will you rescue me?� With that, Winky jumps into your Pack.
28, 34: Tunnel goes up, �climb�.
50, 09: Other side of the Tunnel, goes back to Karefhi, who asks if you found the source of the noise. With that, Winky jumps out of the Pack. Karefhi is scared of spiders and panics. Winky realizes this and scares it even more. Karefhi runs out of the Cave with Winky disappearing after it. Well, I guess you�ll have to find information about the Tatterdemalion somewhere else!
O-017, 173: Giant Ogre Caves.
* As you enter two Giant Ogres are leaving and think you are in �disguise�. They tell you to go show the disguise to the King. This gives you an idea how to get past the Guard. You tell him you were asked to see the King, so he lets you by.
52, 33: Secret passage to two chests; one with five empty sacks and the other full of raw Berries.
35, 55: Two Obelisks; �Don�t cum in!� Inside, you find a box with: Gold, Chalk, Trophy, Star, Bell. As you leave, a Giant Ogre asks if you were just in there. �No� will invoke a fight. �Yes� so confuses him, he faints dead away.
45, 20: Secret passage to a ledge overlooking a large cavern with Giant Ogres under the command of the �King�. Suddenly the ground opens and the Tatterdemalion emerges. The Tatterdemalion asks how the invasion plans are coming. The King answers that they�ll be ready in an hour, maybe earlier. �Not all of Triane.� The Creature says. �Remember the Mark!� �Oh, yeah� answers the King. �Anyone with a Mark, we leave alone.� The Tatterdemalion says, �If they won�t surrender, you kill them. They will live under my rule, or they will have to face your wrath! Remember � leave the Marked people alone!�
Listening to all of this, you realize that the voice of the Tatterdemalion has been magically altered. Is this an audible illusion?
08, 34: Large stone column that seems to be supporting the ceiling of the Caves.
09, 15: Large body of water. Giant Ogre says, �Don�t make noise, you�ll scare the fish!�
17, 19: Treasure Pit. Guard. Talk to him about the Treasure Pit. Ask, how �deep�? He will tell you it has to be deep because of the �Thieves� and �Rabbits�. �Thieves� will make him think you are dumber than he is and he�ll, then, disregard you. �Rabbits� are the Giant Ogres� mortal enemy. If you mention the word, everyone will panic and you will have to fight all of them.
* Return to the column. Draw a picture of a rabbit on it. It will take a bit of encouragement, but, eventually, the Giant Ogres will think the picture is a danger and will attack the column. Run to get out of the Caves, because their damage will bring down the mountain upon them! As you leave, half the mountain falls in. The Army of Giant Ogres has been destroyed!
Return to the Grove and tell Verena of the Tatterdemalion�s plot to use an Army of Giant Ogres against Triane. At first, she�ll freak out, but you tell her they�ve been destroyed.
Tocaunde whispers in your ear that Verena is old and her mind is starting to weaken. She�s run this Grove beautifully, for years. He also asks if you learned any more about the Avian threat. You say, �No.� He says that he hasn�t either, then thanks you for destroying the Ogres.
You tell Verena about finding another hiding place for the Tatterdemalion and it turned out to be the home of a Dragon. She puts you off, saying that the Avians are a greater threat.
Tocaunde asks what you learned and you tell him the Dragon told you the Tatterdemalion isn�t a Monster, at all. It�s just a person, (of unknown origin), wearing an illusion. Tocaunde says that if it�s not really a Monster, maybe it�s not killing the people it captures. �Well, adventurers, it looks like you�ve got a Mystery to solve.�
O-068, 083: Caves near Opelka.
Map of Outcastle
* As you enter the Cave you sense a faint magical trail and now you�re sure the Tatterdemalion has been here. Someone was guarding the entrance, then ran when you came in.
31, 52: Tunnel up to secret passage through floor. �Climb� Enter room with Outcasts, mad from Berries; Fight.
13&14, 35 / 20, 29&30: Both ends of room lead to Hall.
14&15, 32: Small Barracks
14&15, 23: Hall
15&16, 20: Temple and Prayer Rooms.
16, 10: Prayer Room. Chair with �Ruby Key�.
25&26, 20 / 33&34, 20: Melee Training Room.
35, 15: Painting with �Gold Key�.
39, 14; Wizardry Room.
42, 11: Book Shelf, Tome about �Outcasts�, thrown out of their Cities who reacted badly to Berries.
46, 11: Tome describing how south east portion was not dug out because it wasn�t needed.
40, 18: Potted Plant with �Sapphire Key�.
52, 25: Main Hall.
25, 41: Secret passage to six Potions.
53, 20: Door with three Locks: Ruby, Sapphire, Gold. (three keys)
* Open door, four chests with treasures!
52, 11: Loose Stones in Floor. Climb down, passage south.
55, 54: Secret passage outside.
You return to the Grove to tell Verena about your adventure in Outcastle. It dawns on you that the Tatterdemalion had gone to Outcastle to bias the outcasts against you. The whole place had been an elaborate trap.
As you�re leaving the Grove, Tocaunde yells, �Adventurers�! Come back! The Grove is under attack!� The Avians didn�t fly in. they came right up, out of the ground, like the Tattered thing does. You rush to the center of the Grove to fight alongside Verena and Tocaunde.
After defeating the Avians, Verena says, �That proves there�s a link between the Avians and the Tatterdemalion. You must discover that link.�
Tocaunde adds, �they�ve never attacked in such numbers and not through the ground.� �Let�s review what we know.�
First, We know the Tatterdemalion is not a Monster at all, but someone wearing an illusion of a Monster.
We, also, know it has some Allies in Triane, marked in such a way that even Giant Ogres can identify them, but humans can�t. So, it must be some secret kind of mark.
The Tatterdemalion must be captured and brought to the Grove to be unmasked in front of me, Verena, the three Leaders and anyone else who wants to get to the bottom of this mystery.
Then, there are the Avians, who are linked t the Monster in some way. Avians don�t like long distances, so they must have a Base nearby. Avians like dry climates, so they are probably in the Desert, west of here.
Ask around the humans. Someone must know a way through to the Desert.
You must do two things:
1.) You must find and attack the Avian Base.
2.) You must reveal the identity of the Tatterdemalion.
You mention the Avians attacking the Grove. She says that doesn�t make sense. Nobody wants to see the Grove destroyed. Somebody must be crazy. Who would attack the Grove��� unless?? What if this person�s real goal is to rule Triane? Gonsella says to tell Helfin about this. He doesn�t want to be disturbed, but tell him �Gonsella� says it�s �vital�.
You tell Helfin the Tatterdemalion is a hoax. He says they know that. Then you tell him about the Super Ogre Army, the �marked� people, etc. He says this changes everything. If someone�s out to conquer Triane�. They must be living in the Desert. There�s a path to the Desert you must learn. He shows you a map and points out a hidden Fissure which you�ll recognize. One more thing � Helfin thanks you for the information. Arichat has a book on Avians. Visit him and learn what you can. No attack on Aegre will occur until you at least try to get to the Avians and learn their connection with the Sorcerer who�s behind all this.
You talk to Arichat and just get into another argument.
Talk to Reve�. She has the Book. She tells you to talk to Gonsella. You tell her you�re planning an attack on the Avian Base. So, she says she�ll summarize what she�s learned about the Avians. Avian Bases are almost always �Magically Sealed�. There must be some sort of a password, or something.
* Ask around in each town and you�ll learn that Conray, in Opelka, found a dead Avian at the base of the Mountains. It had a small statue of a bird. For some reason, he felt it was important to bring it back to Opelka. He shows it to you and you identify it as a �Heron�. You feel this may be of some importance, sooner or later.
O-023, 167: Fissure. Path to the Desert.
O-009, 150: Abandoned house in the Desert.
20, 11: Statue. Loose plaque with papers in Arichat�s handwriting.
24, 17: Soft Wall. �Move Mountains� to escape Basilisks.
O-012, 129: Hole in ground to Snake Cult.
O-035, 109: Centaurs battling Avians.
O-023, 083: Sun Priestess.
O-006, 056: Scorpions & Mutant Spiders.
38, 12: Dead Avian with � of Stone Tablet.
O-041, 055: Dead Avian with broken Statue of an Eagle.
(* Because he was of a different �tribe�, he was pecked to death by the Heron tribe.)
O-013-015, 009: Avian Fortress.
50, 07: Touch Magical field. Voice asks, �Name your Tribe, Avian.� Answer, �Heron.�
* You are transported to the north west room of the Castle. Fight four �Guard Dogs�
12, 14: Secret passage to N/S Corridor, West.
(*ED: For specific locations in the Avian included at the end of this Walk Through.)Castle, see the list of �Locations�
Map of Avian Castle
Weapon Smith room � Library � Sorcery Room.
Small Barracks � Big Barracks.
Treasury Room, (Foyer is Trapped! See list of �Locations� included at the end of this Walk Through.)
Rooms with Statues of Bodyguards, Sorcerers & Holy Ones � Room like the Grove,
Dining Hall � Firebird�s Sauna � South Prisons.
Room with Firebirds having Feast.
* Room with Statues of Bodyguards.
38, 29: Glowing Book is actually a Scrying Device! In it�s memory is a picture of Arichat, Dolomite�s Quartermaster, writing in a Ledger Book with a Quill Pen and Go lden Ink.
* Room with Statues of Sorcerers.
51, 32: Glowing Book is actually a Scrying Device! In it�s memory is a picture of a scene from a Battle in Aegre, when the Tatterdemalion took Vilonia. The image of the Monster flickers. Sometimes it looks like a Monster, at other times it looks like a Glowing Suit of Plate Mail.
* Room with Statues of Holy Ones.
19, 32: Glowing Book is actually a Scrying Device! In it�s memory is an image of your Party talking to Roselle.
* Room that looks like the Grove.
There is no Glowing Book in this Room.
19, 43: South Prisons.
42, 54: Book on a pedestal of a Wizard�s attempts to subjugate various powerful creatures. The last entry says, �Tomorrow, it will be time to once again try enslaving that horrible Dragon, Karafhi.�
* Stand on Rune to open Cells: Battle. Basilisk, Ruby Skeleton, Demon Golem, (Gold Ring of Protection).
42, 26 and 42, 33: E/W halls to N/S hall, East.
49&50, 17: Avian Lord�s room.
48, 09: Chest with Diamond Necklaces. * You note that Avian Spell Casters� wear Diamond Necklaces!
49, 09: Brazier with Lever at base. �Look� (Exposes doors to the Throne Room.)
49&50, 43: Throne Room.
* When you kill one of the Avian Royalty, the other flies off with some of the fighters. You have to deal with the remaining fighters, then figure out how to get out of this Castle.
53, 52: Bookcase with parchment letter to the �Royal Avians� The author claims to be from one of Triane�s Cities and shows the layout of the Grove and each of the Cities, including the details of areas vulnerable to attack. If the Avians help the author conquer Triane, the Avians can have the Grove and Berries forever.
There is a second letter thanking them for forming an Army and states that another letter will be coming soon. Both are signed, �Your Human Friend�.
49, 53: Painting of a Wizard. �Look�. He will show you the way out of the Castle if you know his name. �Melvin�.
He says to tell that Dragon, he�s next on his list.
* You appear outside the Castle.
In the meantime, go to Aegre and talk to Yunam. He says he has information about something called, �the Well�. Apparently there is some link between the Monster and the Well.
In Aegre: Yunam asks, �You talked to Verena and she said to come here, right?� You answer, �Right.� He tells you that the Well is a large lake of Magical Energy in which we soak objects to turn them into Magical Weapons. Only High Ranking Sorcerers are allowed to go there. The day before Vilonia was captured, she was at the Well and discovered a secret chamber under it. None of us knew this, but someone did, because there was a sizeable object buried under the Well. Vilonia found the chamber, but not the object. Something has been stolen from under the Well. No Sorcerer could have known it was there.
I met with Helfin and Roselle and they forbid me to go there and look for and more clues. Bodyguards and Holy Ones are guarding the entrance. They will allow you to enter. Please go to the Well and prove we are not behind the Tatterdemalion. He touches your foreheads � Now you will see the entrance. Look for a pit in the grass near the lake that sits south west of Aegre.
The chamber beneath the Well wasn�t very big. I�ve been wondering � what if it wasn�t the Tatterdemalion that was down there, but it may have been an item that could generate illusions. It would be a very powerful item to fool Sorcerers.
O-133, 179: Pit, the Well.
As you enter, more than a dozen guards tense up, then realize it�s you. The leader asks if you know your obligations. You tell him you do. You are obliged to discover the truth and report it to all the Group Leaders. Satisfied, he moves aside.
* It seems no one has told you where this secret chamber is. You�ll have to search the old fashioned way.
Map of The Well
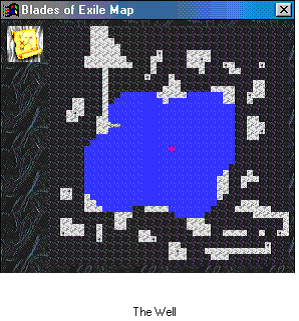
14, 20: Boat to access the Magical Lake.
12, 37: Secret passage to,
10, 39: Pressure Plate #1. Triggered when you stepped on it.
32, 13: Secret passage released when you stepped on Pressure Plate #1.
29, 12: Pressure Plate #2. Triggered when you stepped on it.
29, 38: Secret passage released when you stepped on Pressure Plate #2.
* This leads to a Pit. You can�t climb down, but can jump.
16, 16: You land softly, but now there�s no way back up.
* You�re in a room lit by torches on the wall. Someone has been here recently.
10, 18: Desk with a rough draft of a parchment letter written in Gold Ink!
�My Fine Feathered Friends,
Am in the process of planting evidence that will make it clear that Vilonia, the head Sorcerer, faked her own disappearance and is behind the appearance of the Tatterdemalion.
I do not expect anyone to see through this illusion��.(poorly written)��tomorrow evening. ��(more poor writing)��will gain revenge on those snooping outsiders once and for all.�
11, 19: Statue with a plaque, �NOMERRET: The greatest of us all.�
12, 20: Bookcase with a parchment written by Nomerret.
* He didn�t like the idea of sharing this valley with two others who didn�t agree with his views. He accidentally discovered the Well, which infuriated him because the Sorcerers found out about it and plant ed Aegre on the land he wanted. The Sorcerers grew stronger and the land became �corrupt�.
Nomerret dug out a secret area beneath the Well, but close enough to the Magic water, so that anything he placed there would become Magical! He put the finest Suit of Armor he could find, there.
* You suddenly realize that this is a Will. The armor has lain there for as long as Triane has been settled � over seventy years! Nomarreth has �bequeathed� this Armored Suit to his �grandchildren�!
21, 21: Secret passage to Cells, Vilonia and the other prisoners. (Must hear them call for help twice!)
* She tells you they�re all prisoners to the Tatterdemalion. You say you�ll get them free as soon as you figure out how.
As you return to the room, the Tatterdemalion enters, cursing the Avians for running away from the Party and now they won�t form an army with him.
As he relaxes the illusion you se the actual Armored person and he sees you!
Battle.
You�ve done it! The person inside the Suit has been thoroughly pounded. A low groan comes from the Suit � That�s all!
There is a set of keys on the Tatterdemalion�s waist � You release Vilonia, Dothar and the others. All of you form a human pyramid to the opening in the ceiling so one of you can go for help. Everyone is rescued.
Triumphantly, you march into the Grove with the Tatterdemalion in tow. Everyone is there. You wake up the Monster and unfasten it�s helmet. It�s ARICHAT!
As you explain:
The first clue was it�s choice of Victims; mostly Sorcerers Holy Ones and Leaders who promoted Magic. When he chose a Bodyguard, it was Lula, who distributed Magic Weapons and Armor. Arichat was out to eliminate all traces of Magic from Triane.
Someone asks, �Wasn�t there a second Bodyguard?� You answer that it was just coincidence. Someone was just in the wrong place at the wrong time.
You go on to tell the story about the Grandfather and the Suit of Armor.
Lastly, you were sure when you saw the half written letter in the Monster�s Lair. It was written with Gold Ink. In the Avian Fortress you saw an image of Arichat keeping a Ledger of his duties as Quartermaster. He was writing in his Ledger in Gold Ink.
As for the �marked� people, Arichat was the Leader of an �Inner Circle� of Bodyguards who don�t eat Berries. They all have a special tattoo on their scalps.
Arichat is pulled out of the Suit of Magical Armor and you are given it as a reward for solving the mystery.
And so on to the end of the scenario.
Bodyguards (BG), Holy Ones (HO) and Sorcerers (SO). Anything not so identified is applicable to ALL scenarios.
Cities & People:
O-139, 179: AEGRE: Home of the Sorcerers, (Mages).
23&24, 36: EUGENE: The Information Bat.
* (SO), Shows location of �Cave�, west of Aegre.
36&37, 21 and 09&10, 21: SORCERERS ONLY!: Only in the Sorcerer Scenario, �Mystery�
23, 06: CIBEK (SO): Mage Spells, Levels 5 & 6.
21, 18: VILONIA: Leader of the Sorcerers.
* If you become Bodyguards, return and ask me about, �Service�.)
* (BG), Eliminate Null Bugs, gives Necklace, (Haste(8)).
* (BG), Shows you the location of all the Caves in Triane.
* (BG), In Part 2, gives a Dagger, (Bonus on Reptiles & Birds).
* (BG), Has a sister in Holy Ones with similar Necklace, (Bless(8)).
26, 18: YUNAM: Second in Command:
* Mage Spells, Level 4.
* (SO), Later describes, �the Well�.
28, 25 and 32, 27 and 34, 26: GALENE: Potions; Medium strength.
32, 35: SULLIGAN (BG, SO), NELL (HO): Alchemy Lab, Ingredients.
14, 37: CORTLIND: Food.
* (HO). Tells of Cave of Troglodytes, shows location.
12, 35: HIRUU: Retired!
O- 011, 180: DOLOMITE: Home of the Bodyguards, (Fighters).
37, 21 and 40, 21: DREFFLE: Identify, Sell.
* In �Introduction� section, mentions Arichat and his, �Inner Circle�; says to ask Arichat about, �the Pure�.
* (HO), Tells you to ask Reve� about, �Monster�.
13, 34 and 21, 34: BODYGUARDS ONLY!: Only in Bodyguard Scenario, �Addiction�.
13,38: LULA (BG), Magic Weapons. Small supply at first, All in Part 2: Avians.
21, 38:FORDYCE (BG), Master Trainer, including Magic.
* Says, �Arichat would have a �fit� if he knew he was teaching magic.�
22, 40: Locked Door in Floor.
33, 27&28 and 27, 32: Main Hall.
25, 25: HELFIN: Chief Bodyguard.
(* If you become Holy Ones, return and ask me about, �Temple�.)
* (HO), Mission to Swamp of Undead. Reward of Magic Weapons & Armor.
* (SO), Tells you the Tatterdemalion left a Magical Trail, west of Bodyguards Only Building.
28, 25: REVE�: Second in Command.
* (HO), Tells about Cave of Ogres, shows location.
* (SO), Is reading Arichat�s Book on Avians.
31, 28 and 29, 30: ARICHAT: Quartermaster.
* (BG), Ask, �Pure�, tells you to come back.
* (BG), In Part 2, will give you � of Square Rock Tablet.
* (SO), Has redecorated Office; � Counter, Bookshelf, etc.
27, 37&38 and 37, 37: Master Crafters:
SARIEN: Armor, Shields, Helms.
Thinks Arichat is a great Warrior.
TIERNEY: Bows, Arrows.
Thinks Arichat is close minded.
GONSELLA: Weapons.
Thinks highly of Arichat.
* CORAY: (BG), Saw Avians fly off with large, square rock.
10, 25&26 and 16, 25&26: Guards Quarters.
07, 38: (SO), Magical Trail left by the Tatterdemalion.
15&16, 11 and 15&16, 15 and 32&33, 11 and 32&33, 15: Under Construction.
* Under Construction during �introduction� stage, becomes a Barracks in scenarios.
O- 071, 0 73: OPELKA: Home of the Holy Ones, (Priests).
33, 31: HOLY ONES ONLY! Only in Holy Ones Scenario, �Revenge�.
WOODLE (HO): Priest Spells, Level 5 & 6.
* (HO), Shows you a map of the Outcasts� Cave �location�.
22, 24: DOTHAR: Leader of the Holy Ones.
(* If you become Sorcerers, return and ask me about, �Tome�.)
* (BG), In Part 2, opens Fissure to Desert available.
22, 28: ROSELLE: Second in Command to Dothar. *Heal.
* (SO), �Mission�, Retrieve Tome from Arch Mage�s Tower in Swamp, east of Opelka.
12, 10: MILLES: Priest Spells, Level 4.
33, 08: NABLE: Weapons.
35, 39: CONRAY (BG, SO), DEYLAN (HO): Armor, Shields.
* (SO), Shows you a small statue of a �Heron� he found on a dead Avian.
15, 37: LEDLAND: Librarian.
* Says he always wanted to be a Sorcerer.
* (SO), Shows you a map of Mountain area of Outcasts.
Areas & Encounters:
O-070, 122: The Grove. (Verena & Tocaunde.)
O- 060, 017: Oasil�s Hideaway: Desert Entrance.
O- 070, 122: Oasil�s Hideaway: Mountain Entrance.
*Oasil: Train, Heal, Identify, Sell.
O-139, 182: Secret Swamp Path to Swamp with Null Bugs. (BG-Vilonia)
O-149, 117: Breeding Grounds.
24, 07: Hole in ground to Queens nest.`
O-167, 215: Bog Beast ambush.
08, 07: Bodies with treasures.
O-149, 161: Wil-o-the-Wisp Lair
25, 11: Wil-o-the �Wisp�s Treasure.
O-013, 183: Secret Swamp Path to Swamp with Undead. (HO-Helfin)
O-012, 203: Wil-o-the-Wisp�s Lair.
25, 11: Wil-o-the-Wisp�s Treasure.
O-072, 211: Bog Beast ambush.
08, 07: Bodies with Treasures.
O-106, 206: Temple in Swamp.
18, 17: Opening in wall, after battle.
05, 09: Opening in wall, after next battle.
O-080, 085: Swamp Path to Arch Mage�s Tower
14, 31: Door to Room with locked Gate.
04, 07: Obelisk with a sine, �Vault #1�. Voice says, �Get twenty. (Mushrooms!)�
* (4, 4, 4, 3, 5), Portcullis opens! Be there!
* Chest with treasures and illusionary floor back to the Staircase.
21, 24: Door to Corridor.
* Start at 04, 14. Quickfire starts at 07, 14. (Enter �Combat� Mode) �Get� the Robe of Arch Mage at 14, 14. Secret Passage at 13, 14. Teleports to 13, 17. Series of hidden doors going west to 14, 17 teleports you back to Staircase.
32, 13: Door to Room with locked gate.
* Lever on floor and three images, north.
* Works like Slot Machine. Pull until three Runes appear, Gate opens. Other times, fight!
* Chest with treasures and illusionary floor, yanks you into a secret room.
42, 36: Book, east end of Bookcase opens to next room with Lich, (Arch Mage) and three Imps.
37, 31: Pedestal with Tome Rochelle wanted.
40, 37: Pedestal takes you to bottom of Staircase.
O-118, 066: Wil-o-the-Wisp�s Lair
25, 11: Wil-o-the-Wisp�s Treasure.
O-167, 072: Bog Beast�s ambush.
08, 07: Bog Beast�s treasure.
O-135, 167: The Mountain Path to Dwarves� Caves. (BG)
35, 10: Leads to, 10, 32: Small opening in Tunnel;
20, 45: Leads to, 09, 37: Small opening in Tunnel;
*Both lead to, 32, 58: Small opening in Tunnel.
54, 11: Footsteps into cave wall, *Secret Treasures
50, 43: Main Cave. Fight, free hostage, EDAREH. Reward, Necklace, (Bliss (8)).
O-017, 173: Caves of Giant Ogres. (SO-Reve�)
O-051, 142: Caves of Giant Ogres. (BG-Helfin, HO-Reve�)
* Two exiting Giant Ogres talk to you. �King� gets you past the Guard.
52, 32&33: Secret passage to Chests with Sacks & Berries. (Giant Ogres are eating RAW Berries!)
35, 55: Secret passage to box with: Gold, Star, Bell, Trophy, Chalk. (Star & Bell are �ruses�, unused!)
08, 34: Pillar with graffiti. �Look�, scenario explains.
* (HO), Use �Chalk� to draw �Star� on Pillar.
* (SO), Use �Chalk� to draw �Rabbit� on Pillar.
09, 15: Shore of large body of water with red fish. (Red Herring! Another �ruse�, unused!)
17, 19: Deep Pit, (Treasure Pit.)
19, 15: Ornate Wooden Stand.
* (BG), Place �Trophy� on stand.
45&46, 20&21: Secret passage to Ledge overlooking Giant Ogres in training with King.
* Must find this to complete the Giant Ogre Cave section! < br>
O-132, 188: Secret Cave of Troglodytes. (HO-Cortlind)
32, 28: Middle Island. Lever opens Cave wall, south.
27&28, 47: Opening to Hidden Cave.
* King questions you. �Yes� = Battle. �No� = Information about Tatterdemalion.
O-126, 173: Cave west of Aegre. (SO-Eugene.)
45, 19: Cave wall opens. KAREFHI
16, 19: Hidden door.
20, 45: Secret Door: WINKY
28, 34: Tunnel �up�.
O-061, 089: Caves near Opelka to the Outcasts� Castle. (BG-Vilonia)
O-079, 077: Caves near Opelka to the Outcasts� Castle. (HO-Woodle)
O-079, 085: Caves near Opelka to the Outcasts� Castle. (SO-Ledlead)
23, 27&28 and 28&29, 23 and 37, 27&28 and 32&33, 33: (BG, SO), Main Hall/Dining Room.
25, 41&42: Secret passage to six Potions.
23, 27&28 and 28&29, 23 and 37, 27&28 and 32&33, 33: (HO), Big Barracks.
30, 40: Secret passage to six Potions.
15&16, 20 and 20, 15&16: Temple & Prayer Rooms.
11, 13: (BG), Chair. �Look�, �Ruby colored Key!�
11, 17: (HO), Chair. �Look�, �Ruby colored Key!�
16, 10: (SO), Chair. �Look�, �Ruby colored Key!�
25&26, 20 and 33&34, 20: Melee Room.
24, 13: (BG), Painting. �Look�, Loose, �Gold colored Key!�
35, 17: (HO), Painting. �Look�, Loose, �Gold colored Key!�
35, 15: (SO), Painting. �Look�, Loose, �Gold colored Key!�
39, 14&15 and 50, 14&15: Wizardry Room.
44, 19: (BG), Potted Plant. �Look�, Lump in soil, �Sapphire Key!�
48, 19: (HO), Potted Plant. �Look�, Lump in soil, �Sapphire Key!�
48, 18: (SO), Potted Plant. �Look�, Lump in soil, �Sapphire Key!�
53, 20: (BG, SO), Door with three locks: Ruby, Gold, Sapphire. (Chests)
51, 22: (HO), Door with three locks: Ruby, Gold, Sapphire. (Chests)
52, 11: (BG), Loose floor stones. (HO), Trap Door in Floor. (SO), Secret Passage.
49, 51: Secret passage to encounter, (BG).
55, 54: Secret passage. (Out)
O-023, 167: Fissure in Mountains, Path to the Desert. (BG-Dothar, HO-Dothar, SO-Helfin)
O-009, 150: Abandoned House in Desert.
20, 11: Statue. Loose plaque with papers in Arichat�s handwriting.
24, 17: Soft Wall. �Move Mountains to escape battle with Basilisks.
O-012, 129: Hole in ground to Snake Cult.
O-035, 109: Centaurs battling Avians.
O-023, 083: Sun Priestess.
O-006, 056: Scorpions & Spiders.
38, 12: Dead Avian w/ � of Stone Tablet.
O-041, 055: (BG-Avians flying overhead.), (HO-Dead Avian w/ Yellow Orb.), (SO-Dead Avian w/ Broken Statue of Eagle.
Pass over you to fight the Tatterdemalion (*Killed by enemies, Heron Tribe.)
O-011&012&013, 009: Avian Fortress.
(ED: * T.R.K. used the same �pattern� for the rooms in all three scenarios, but gave them different contents. Rather than list all the Doors, Corridors, and minor items, I have simply identified the rooms, by scenario, then included �special� items to be found in the rooms. Refer to the pictures included in each section of the Walk Through.)
12, 07: (BG), Low, accessible window. �Climb�.
56, 34: (HO), Small hole in Magical Field. (Yellow Orb)
50, 07: (SO), Hole in Magical Field. Voice asks, �Tribe�, answer, �Heron�.
* Room with four �Guard Dogs�
12, 14: Secret door to N/S Corridor.
* Weapon Smith�s Room.
25&26, 22: North Room. * Won�t unlock, (unused).
* Room with Lake. (Water) (BG), Room with Statues of Bodyguards. (HO, SO)
38, 30: Book on Pedestal is a Scrying Device.
(HO) You see Bodyguards being trained. Not very informative.
(SO) You see Arichat, the Dolomite Quartermaster writing in his Ledger Book,
; using a Quill Pen and Gold Ink.
* Room with Lava. (Fire) (BG), Room with Statues of Sorcerers. (HO, SO)
51, 33: Book on Pedestal is a Scrying Device.
(HO) You see Galene, Aegre�s Chemist talking to a Holy One.
You can�t see who it is because they�re wearing a Hooded Cloak.
(SO) You see the Tatterdemalion taking Vilonia. The image flickers.
Sometimes you see the Tatterdemalion, sometimes a glowing suit of Plate Mail.
* Room with Wind. (Air) (BG), Room with Statues of Holy Ones. (HO, SO)
19, 33: Book on Pedestal is a Scrying Device.
(HO) You see an image of Dothar yelling at Ledland for not doing his job
*Ledland is holding a very thin, very old, Book behind his back!
(SO) You see an image of your Party talking to Roselle.
* Room with Dirt. (Earth) (BG), Room built to look like the Grove. (HO, HO)
(HO) There is no Glowing Book in this Room.
(SO) There is no Glowing Book in this Room.
37, 11: Foyer to Treasure Room. * Foyer floor is a maze! (Damage is relatively �minor� but frustrating.)
Solution: Using �X, Y� coordinates; there are five rows and eleven columns. Top left = 26, 09. Bottom right = 36, 13.
The �SAFE� coordinates to the Treasury Room Door at 25, 11&12 are:
Down 09: Across 26, 30, 31, 32, 34, 35, 36.
10: 27, 28, 29, 30, 32, 33, 34, 36.
11: 26, 28, 30, 31, 34, 36.
12: 27, 30, 31, 33, 34, 36.
13: 27, 28, 30, 31, 32, 34, 35, 36.
25, 11&12: Treasure Room.
18, 14: Secret passage to �Beautiful Armor�. (Martyr�s Shield (5)), (BG)
18, 14: Secret passage to Ring of Speed, (HO, SO)
19, 43 and 35, 20: South Prisons.
29, 51: Ruby Skeleton.
34, 47: Basilisk.
24, 51: Demon Golem. �Gold Ring of Protection.�
42, 54: (SO)Book on pedestal about Wizard who captures various powerful creatures.
34, 20 and 19, 20: Main Dining room. Avians having a Ceremonial Feast.
49&50, 17: Avian Lord�s Room.
49, 09: Brazier. �look�. Lever at base is accidentally �tripped�. (Reveals doors to Throne Room!)
48, 09: Chest with Diamond Necklaces.
49&50, 43: Throne Room.
53, 52: (SO), Bookcase, �look�, letter to the Avians.
49, 54: Painting of Wizard who built Castle.
* (BG), �Look�. He will allow you to leave if you can tell him his field of interest. � Elements�.
* (HO), �Look�. Say, �Goodbye�. Scenario controls. You appear outside Castle.
* (SO), �Look�. Wizard asks if you know his �Name�. �Melvin�.
O-072, 126: (BG), Hole in ground above �The Grove�. (BG - Tocaunde)
O-071, 128: (HO), Hole in ground above �The Grove�. (HO - Verena)
* See Walk through for safe access routes. * Different routes for BG & HO!
O-133, 179: Entrance to �the Well�. (SO-Yunam)
14, 20: Boat.
12, 37: Secret passage to �
10, 39: Pressure Plate that opens �
32, 13: Secret passage to �
29, 12: Pressure Plate that opens �
29, 38: Secret passage to �
35, 38: Secret passage to pit. �Jump�
16, 16: Half lit Room.
10, 18: Desk with rough draft of a letter to the Avians.
11, 19: Statue of NOMERRETI.
12, 20: Bookcase. Document written by Nomerreti. (Explanation.)
12, 21: Secret passage to imprisoned captives. (* Cannot find until second time they yell for �Help!�.)